Lay out your plane. Draw lines on the wood. Layout is critical. I may put a post in on the subject. Then saw out the mortise down to the required depth. In my case 1cm. Then chisel out the waste. Do this very carefully.
 For the record, the dimensions of the block are 140x21mm. Not responsible for the 21 mm dimension, no doubt some meaningful number in RGU. As you see, I have two ramps. The left one will be the called the blade ramp. Once cut it will never be touched. It is a 45 deg. angle with the sole of the plane. This is standard pitch for a plane. If you plan to cut hardwoods you might want a classic York pitch, 57 deg. The other one is the wedge ramp. I happened to cut this one at 60 deg. It is not critical. You will cut the wedge to suit it. My ramp is one cm deep; 10mm for the units nannies who keep insisting on obsoleting centi- and deci- prefixes. Fie! Computerization strikes again. If you can't multiply by ten in your head, you have real problems and should be back in first grade. And would never read this blog in the first place.
Next chore is to shape the blade. Critical. My blades are (so far) all of 10 mm radius. So I cut out a piece of circular saw to approximately the right shape. I must tell you how I do this, it is a nice journey all by itself. Draw your blade on paper. Cut it out oversize. It can be done with a hacksaw. A grinder is nice too. Do not worry about the radius too much at this point, but leave a generous (2mm at least) allowance. So what we have at this point is something like this.
 Actually I made several mistakes. I did not cut enough oversize. No matter. Same old story; easy to take off, impossible to put on. One mm off. Fix later.
In order to aid fitting, you will have to make a cutout on the non-ramp side of the plane. When you do, cut on the wedge ramp side of the plane. Never touch the ramp! Lesson learned from the first plane.
 It really helps if you have put the layout lines on both sides of the plane. I did not. Mistake. Lay the thing out completely on both sides! Learn from my mistakes.
Next step is to the blade to an exact circular radius with a 25 deg bevel. Very easy to grind the shank, for instance, down to 10mm flat. But grinding a circle with the proper radius is no joke. If your hand is steadier than mine you might do it. But at the same time you have to grind a 25 deg bevel on it. For superman? Child's play. For the rest of us it is time to cook up a jig. As you can see, the center of curvature is right at the corner of the shank. I filed up a small (ca. 1 mm) cutout there. As for the jig, here's v0.0...
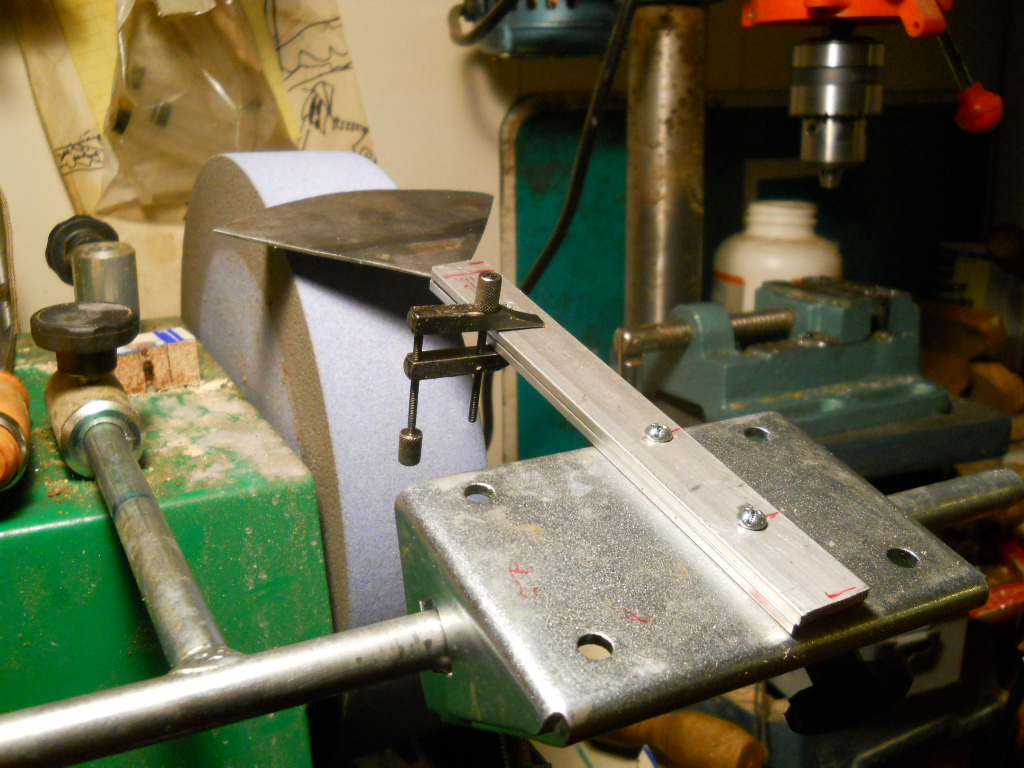
 Lot of things going on here. The whole thing is done on my TSO (Tormek-Shaped Object) wet grinder. The bottom part of the jig comes from the kindly asiatic manufacturer. Let me call it the table. Bolted on to that is an aluminum bar, exact dimensions unimportant. About 10mm from the end of the bar, middle of the pic, is a finishing nail, about 0.7 mm nail. Again some RGU system. I drilled the hole undersize, pounded it in, and used superglue to make sure it stayed put. I later improved this jig to grind ulus, but this one will do for now. My angulometer is being used to set the 25 deg bevel angle. This is done by pulling out the table support, also supplied by the manufacturer, and by rotating the table around the support. Now the blade is free to rotate on the nail, and all you have to do is rotate the blade. The blade does tend to come off the nail. So you have to hold it on the nail by hand. By the way the grinder rotates away from me. If I turned it around I wouldn't have this problem! But I prefer grinders rotating away. This jig cries out for improvement, which is why I improved it later.
Now turn the grinder on and start rotating the blade. As you do, hold the blade firmly against the nail. In a wet grinder, things happen in slow motion. On a dry grinder you ruin your work in an instant. And rotate the blade! I repeat, rotate the blade. If you don't you will grind a flat spot on the blade.
An ulu, by the way, has exactly the same problem. Got to grind a circular profile with a given bevel angle. The ulu jig works very nicely and you don't have to worry about holding the blade against the nail. I drilled a hole as close as I could to the center of curvature.
 There are two bars this time and a clamp to hold them together, but the principle is the same. Next circular plane blade I build will allow for a 7mm hole to be drilled at the center of curvature. This is jig v0.2.
And of course, you must harden and heat-treat the blade. Microforging; propane torch work. See previous posts. And hone it!
Anyway we now have a nice circular blade. Now we have to fit it to the plane. We want a zero throat opening at this point. The reason for this is that it is much, much, easier to cut wood away than to put it back. Gradually, with a chisel, open out the wedge ramp until you have a 0.5 mm throat or even less. The narrower the throat the finer the cut. Do not under any circumstances touch the blade ramp. Your final touch is to drill a hole to allow the shavings to escape. Do this last.
 My hole is 22 mm because I happen to have a 7/8" Forstner bit, which drills a beautiful hole. Anything around that size will do. Drill tangent to the wedge ramp plus a few mm. Make a wedge 1 cm wide to suit your ramps and Robert est votre oncle, as the French most certainly do not say.
Plane works very well indeed. All wedged planes need extensive fiddling until you get the blade depth just right. Tap with a hammer. See Finck's book. Very pleased with this effort. I went to all this length because I have not found any source (besides Finck) who makes planes with shaped blades. Phew! Long post.
.
No comments:
Post a Comment