Saturday, January 29, 2011

The Nano-Xtable

We have now concluded the Christmas presents section of this program and can get back to our regularly scheduled projects.

I have my moto-tool (which is not a Dremel (tm)) mounted in a homemade stand. There are pictures of it all over the blog so I won't repeat. All well and good, but I need a support when I do grinding. I used wooden blocks for a while. They are difficult to clamp, so freehand is just about as good. But an idea came to me, inspired by David Wingrove's books on car modeling. I could make an X-Y table! Then I could do miniature milling with the moto-tool! An X-Y table is a flat piece (the table) that slides on ways in two directions: X and Y. It is turned by screws. So, depending on the accuracy of your srews, you can adjust the table any way you like. I have one, actually, but it is much too big for what I want. Now X-Y movement is what we engineers call "two degrees of freedom." So I thought I would warm up by making a table with but one degree of freedom, an X-table. And I did.
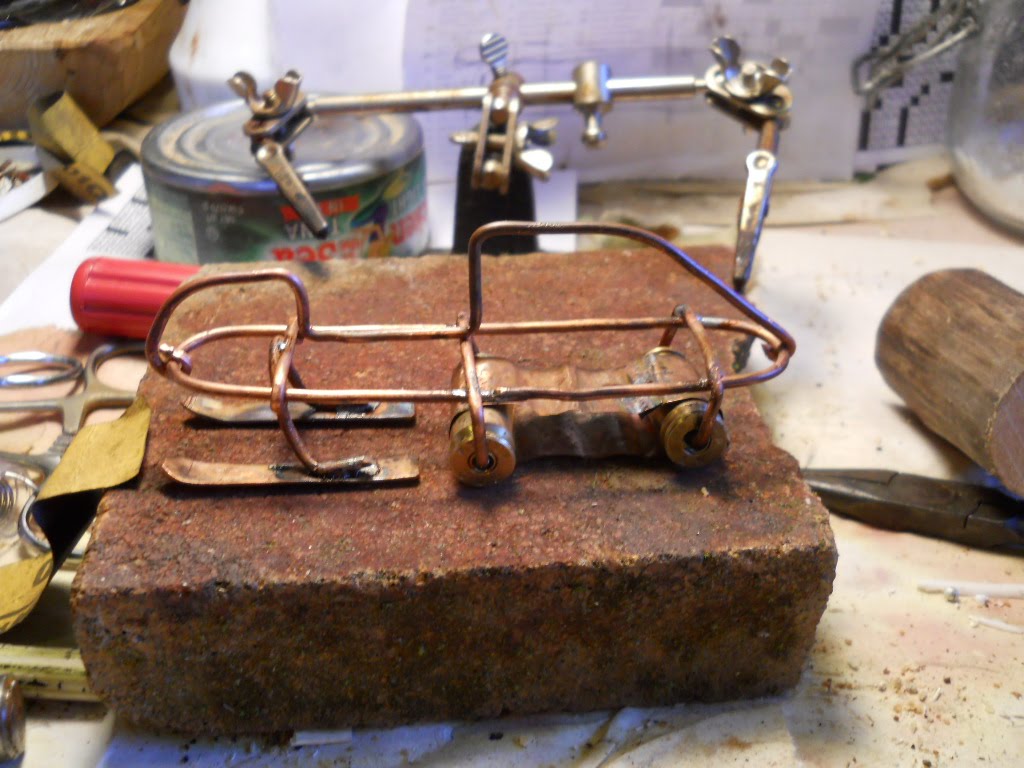
This is the table in its current incarnation, all 85mm of it. Every piece except the ways and bolts was found material from my summer walks. Probably fell off snow machines. Good. The table is a block of aluminum alloy with two grooves cut in it. Providentially the grooves are a perfect fit for the aluminum ways, bought at Lowe's for $1.59 or similiarly low price, and I still have lots left. As you turn the screw, the table moves majestically across the ways. The screw is another objet trouvé -- amazing what people throw away. The white supports are some very dense plastic. I hope it was crucial to the snow machine's operation, said he spitefully. So now on to building it. The first thing I had to do was cut the rabbet (or rebate, a much better word for it) in the plastic supports.
I am using Trusty Taig, the lathe. Thanks to Model Engineering magazine, I find that chucking the end mill right into the 3-jaw chuck gives very nice results. I don't have big enough collets to take 12mm end mills. The plastic, whatever it is, machines beautifully. And note my milling table. This is another find, a right-angle piece of ally alloy that I screwed right down into the primitive vise on the Taig milling attachment. (The Taig atachment is beautiful, but has no vise to speak of. They will sell you one for over fifty bucks. Pah.) I can then clamp to the milling table, as in the picture. I did not make a pass over the bottom of the piece. I will pay for that omission.

The next thing was the feed screw. This is the screw that carries the table (that JRC built). It took some time for me to figure out the obvious. Usually you turn a screw, it moves, right? But this is exactly the opposite. You do not want the screw to move. It has to stay in place. That way, the nut (attached to the table) will move instead. So how do we do this? By removing the thread from the screw where it goes through the support and then securing it with collars. First, a straight turning job to remove threads:
Actually, A groove would be enough, one at each end. But I took off the threads all the way, which leaves lots of room to put in collars. The big-leaguers use circlips, spring-steel circular clips which are guaranteed to reach earth orbit if you don't handle them correctly. Ping! No more circlip. Don't have any. So I cut collars from some of the stiff plastic that came with my brand-new moto-tool packing.
The collars are the white, more-or-less round things at the ends of the screw. Any shape would so, really. Cut them, drill them so's they fit the turned-down section of the screw; split them, force them in. It works! Note the nut attached to the table with JB-Weld, marvellous gunk that sticks to anything. So I can "weld" a steel nut to an aluminum block. Can't do that with your MiG outfit.

I keep looking at this thing and wondering if somewhow I can con it out of another degree of freedom. Then I'd have a true Nano XY-table. Maybe I can. We will see. Not much room left to maneuver. Can't foul the feed screw!

On the net, there is a wonderful article (or was) called "The Fonly Lathe," written by some model railroaders who needed a lathe. They adapted a moto-tool into a lathe. If you google on fonly lathe you should find it. I am slowly working my way up to a Fonly mill. Fonly lathe, of course, is short for "if only I had a lathe."

The ultimate table, Nirvana, is an XYZ-table. Three full degrees of freedom. Hey, maybe I could do X-Z... hmmm. Got to think about this.

Saturday, January 22, 2011

The Nacimiento

A Nacimiento in Venezuela is what is called a creche in English. It is a representation of the Nativity scene. The mother, father, son, and of course the three Kings and as many animals as you can pack in there. In my younger days, Christmas trees were practically unknown, and Nacimientos were the order of the day. Some stores, I seem to remember the now-defunct Almacén Inglés, had enormous window displays including model railroads. Not an accurate historical representation, perhaps, but lots of fun to see. Nowadays, the ubiquitous Christmas Tree has largely supplanted them, much to the dismay of traditionalists.

Anyhow, I know someone who ought to like a Nacimiento. So a year ago now I set out to build one. The first order of business is to carve the figures.
The hardest one was the infant Jesus. This is because infants are very small! I could just suggest the features. There is one King, or Magus, in the group. His crown gave me fits. Again, small is difficult. Here's another King under construction:
The saw work is done, King has been roughed out. Now the knife work begins. Also gouges. Both knife and gouges were made by me; microforging is the label to search for.

Then we had to make the manger. Now this is the subject of another post. I passed it off as a model of next summer's woodshed, which is true. I would have given the show away for sure if I had labeled it for what it is! So the manger then looked like this:
I am in the process of thatching the roof, using real straw from the oats I grew last summer. A bit out of scale. The joints on the manger are all genuine (but unpegged) mortise and tenon; not a single fastener in the whole thing. I made the joints tight so as not to peg them. Making 1 mm pegs was just too difficult. And at last, the completed manger:
I have comandeered a slice of log for a base. I try to make some of these when I have the chain saw at hand. And at long last it is done.
Remains to put it in a box and ship it off. There is a donkey colt and a calf in there, but hard to see in the picture. The ass and the ox bit would take up too much real estate. Thus art compromises with reality.

The Nacimiento was well received. It was a long-running project, a year or so in the making. But worth the effort. I am a much better carver now than I was when I started it!

Wednesday, January 19, 2011

Life at -38C

Until about three days ago, a high pressure area was firmly entrenched over south-central Alaska, where I live. Although sunny, temperatures plummeted; somewhere around Sunday the pressure on my barometer was 1042 millibars and the temperature -38.4C, close to the wimp-out limit on my digital thermometers (-39.8), and in this weather I decided to go for a walk. I can't ski at those temperatures, the cold freezes both hands and feet. However, at least one moose was undeterred by the temperature.
The moose is the slightly darker blob center. I confess to a lousy picture. The camera was in close-up mode. A grave mistake. Change modes inside, before you go out. I had stored camera inside the many layers of clothing I wore (more later) and getting it out is a production, which also freezes your hands because you may be very deft, but I defy you to operate a camera wearing US Army surplus Arctic mittens. You can't wear the cam outside your clothing because the batteries will drop dead in about three minutes.

Anyway, with my hands frozen I went as far as I could, but my hands are a weak point and I started back. On the way, there was Little Lonely Lake.
I am looking mostly East at this point; notice that although it is past 10AM the sun is very coy about exposing itself. Notice also the enormous number of Satan Sled, er, Snow Machine tracks on the lake. They make skiing very difficult. I have to stick to the edge of the lake; the blasted things like to take up the middle. And just about the whole lake.

I survived the experience in good shape, my hands warmed back up. So, perhaps you wonder, what does the hardy Alaska Sourdough wear at -38C? I assure you it will not make the pages of Gentleman's Quarterly.

This is, of course, a posed shot with the camera on a tripod. In Alaska you dress in layers. Long underwear, polypro for choice. Never wear cotton in cold weather. It gets sweaty and freezes. I have several weights of polypro, but will not post embarassing pictures in the blog. But today's was medium (I have some really heavy artillery in reserve). Wool shirt. Padded Carhartt's overalls. Fleecy heavyweight vest by Lowe's; I live in it in winter. Overall my Alyeska down parka, marvellous garment with a fur collar, acquired on the cheap at a spring sale at a thrift store. Knitted cap on head, pull the hood over it. Not shown (cut off by the camera) are the essential bunny boots. This is an improbable footgear made, it seems, out of rubber for the US Army. I had a long conversation, recounted elsewhere in this blog, with a Yorkshireman named Tom, who told me all about bunny boots. First, buy the white ones, not the black ones. Second, try to get the ones with the manufacturer's name (Bata) on them. They go for about $70 these days, but I found a pair for $9 at the Salvation Army! They are miraculous. They are very comfortable besides. They work like a Thermos bottle -- multiple layers with air between.

So there you have it. Today, the barometer down to about 1020 (and falling) and it is cloudy. Light (very light) snow outside. Snowstorm coming up the Cook inlet. I might miss us; then again, it might not. Welcome to Alaska in winter.

Saturday, January 15, 2011

WIre Nut Keyboard

The last of the Wire Nut figure series is Wire Nut Keyboard, for a keyboard player. The figure itself is by by now straightforward. The real difficulty here is making the keyboard. What to use for the keys? For that matter, how do I work a cartridge into the composition? Both problems solved at one go: use .22 shells for keys. I raided my stash of .22s, and came up with a keyboard.
The .22 shells are soldered on to an underframe, barely visible in the picture. The sharps (or flats if you like) are sheet copper. There are no cartriges smaller than a .22 unless you count the .17 cal but that is airgun ammo, no cartridge required. So I used sheet copper for the sharps. In retrospect maybe I should have beat out some copper tubing , but I didn't think of it at the time. The stand should have been straightforward, but I remade it several times to get it at the correct height. So...
And here is Wire Nut Keyboard Player belting out a number. He has been soldered to a sheet copper base, all he needs now is a wood base for rigidity. Contact cement is your friend here.

After one makes all these figures, the final step is pickling -- put it in vinegar and salt; as I think I remarked, this is just like sauerkraut. That gets rid of the flux residues and shines up the copper and brass a good bit.

And so ends the saga of Wire Nuts. We will now move on to other pre-Christmas projects.

Thursday, January 13, 2011

Wire Nut Chef

The saga of the Wire Nut figures continueswith Wire Nut Chef, for a cooking nut. Wire nut chef started out as a stick figure with a nut head, of course.
It is a real pain to solder these stick figures, as I have mentioned before. But, above, we are getting better at it. Note all the holding devices! It is imperative that the solderees do not move in the soldering process.

Now a chef needs some utensils, so the next job is to make some. Let me see, a pot would be indispensable, wouldn't it?
I am very proud of that pot. I hammered it out of copper sheet over a wooden former. Gerald Wingrove (q.g.) tells you how to do this for the incredible car models he makes. I thought a pot, so to say, would be within my grasp. And indeed it was. I am soldering on the wire handle above. Pot needs to be trimmed. And of course I have to make a spoon (out of wire) to stir the pot with. But wait. Chef needs a stove! Can't cook without a stove, so that was the next task.
This is heavy artillery, 12 gauge shotgun shells for burners. The rest is wire-bending. The spoon and the pot repose, for artistic effect, next to the stove on the soldering brick.

Now we need a chef's hat, of course. So we dig out yet another .38 special cartridge case, and I had to JB-Weld that one on; the head kept falling off. Too much mass in the nut.
Et voilá, le chef! I have soldered the works to a copper sheet and will fix a piece of wood to make a stand; the copper alone is just too flexible.

This was a fun figure to make, not too hard; the pot came out very nicely and it was the hardest part of the whole thing.

Saturday, January 8, 2011

Wire Nuts, continued

The saga of the Wire Nut figures continues with the Wire Nut Snow Machine. In Alaska, as I have mentioned before, we don't say "snowmobile." This is lower 48 stuff. So how do we make a snow machine?
Here are some of the pieces. Center is the chassis, bent around the former at left. Disregard the clutter on the right. Above the chassis are the skis, made out of copper sheet with wire struts. At bottom the track for the machine. It rolls on the mandatory .38 special rollers. Gotta have a cartridge! All this stuff is silver-soldered together. A couple of bends in some wire, and we have the machine together:
...and there is the snow machine, sitting on the brick I use for soldering. Best not done on anything inflammable. Needs handlebars but it's close. I waited to make those until I had made the rider; so the next step is to make SM rider. All the stick figures are made the same way, although not to any particular dimensions. Do it by eye; it is an excellent gauge if you give it a chance.
Above, Rider is held in my invaluable third hand gadget that I picked up at the Chinese tool summer tent for $1.10. The nut head is soldered on (torch at right in red). The nut has a huge heat capacity compared to the copper wire. When you solder on the arms, there is grave danger of the head coming off, because it sucks in heat and melts its soldering. But eventually by hook, crook and a pair of hemostats clamped on to the neck of the figure to draw heat off from the head, I got it done. And here is snow machine wire nut hot off the presses (or the soldering torch):
Voilá, a Snow machine Wire Nut. It is very dirty and dull at this point. What we have to do now is to pickle it. We put it, just like Sauerkraut, into a bath of vinegar and salt. That cleans it up considerably after about an hour's pickling. The stand was no big deal, just a piece of wood. Painted white, so it might look like snow. I thought of adding a scarf, à lá Snoopy and the Red Baron, made out of stranded wire. But I decided against it, on the grounds of less is more. Was I right? Don't know. This art business is not simple.

Thursday, January 6, 2011

My Snow's all Wet

We had a winter storm around 30 December. It was quite heavy, about 30cm. So I went out to blow it, and thereby hangs this tale. I have about 200 meters of driveway to blow clear. Actually more, there is the "new" driveway and the "old" driveway. The old driveway was the original for the house. According to the surveyor when the house was sold, the old driveway was not on the property; the poor sellers had to have a new one put in. Maybe 250 meters. Usually an hour and a half does it.

The 31st I went out to blow it all away with trusty Horatio Snowblower, but it blew me away instead. The snowblower kept riding up on a mound of snow it would push up in front of it. Back up and try again. At the end of an hour and a half I had all of 20 meters done. Woe! (and also alas!) What is the problem?

After some examination of the data, in my best Sherlock Holmes manner, I saw what the problem was. The snow was the wettest bunch of snow I have yet seen. It came down at a temperature above freezing. Bad news. A snowblower (mine, anyway) has a snoot, as I call it. Inside this snoot runs an auger. It is in fact an Archimidean screw. Its function is to stuff the snow down the machine's gullet. It revolves rather slowly. Inside the gullet sits a sort of fan -- a centrifugal blower. The blower revolves quickly and blows the snow out of the gullet and up the exhaust chute. What was happening was that the wet snow clogged the auger; no snow in the gullet. No snow blow for you, Charlie.

Well, I reasoned that the temperature would fall overnight. If it got below freezing the snow would cease to clog the auger. So next day, it was -5C. The water will turn to ice. Or some of it will. And indeed ...
Horatio has actually blown out the old driveway, about 75 meters. If it were only my driveway I'd be done. Alas (again), there is "North Basargin Circle" ahead of me. This is no circle, and why it is North I have no idea because that's the way I'm headed. It is not on my property. The beneficient State of Alaska and the beneficient Mat-Su borough do not clear it, arguing that NBC is a "private" road. You can always trust a bureaucrat -- to do you in.

Cleaning this stuff out made me evolve a procedure. You must make one full-width cut (above). I call this the "bull cut" because there is no alternative, you just bull through. Bull until the wheels spin, back up, bull again, ad nauseam. Don't forget, lift up the snoot when you back up. It is heavy. Tough.

After you have made the bull cut, you can take half-width cuts of the rest. There is now traction for the wheels. The snow will blow. It works, but it is slow. I spent five days clearing this mess out. Probably chains on the wheels will help. Got to get some.

I got into a kind of trance. Bull. Half widths. Another bull. I did three hours that day and ran the mower out of gas. Back again tomorrow ( and the fourth day). On the fourth day Horatio got through! Below, we are at the road; I could now get out with the car if I had to.
Behind Horatio is NBC, now clear. I am now on Basargin Road, not to be confused with North Basargin Circle. The outside, especially the grocery store beckons. But there remained "the turnout," a piece of driveway that allows me to turn a circle. No room to back up here. I got it on the fifth day and finally I could get out.

It is all exhausting. Horatio weighs at least 200 Kilos -- I can't pick him up. Just as well, mass is traction. But you have to steer him. And push him to get that last meter. And lift the snoot. And I'm not through yet. I have the New driveway to do. Maybe tomorrow. Once I could get out, I took a couple days off to go skiing. Snow OK, crusty but skiable. Temperatures down to -19C so I don't think I'll have wet snow. But there is the crust. We'll see.

Lysander the tractor might have done it, with chains. But my V-plow is definitely limited in deep snow. Tractor chains are expensive. So we stick with Horatio for this winter. If I could find a bulldozer-type blade that would fit Lysander, that might do it. Thing is, Lysander was built in 1947. Implements hard to find anymore. Meanwhile, Horatio will probably get chains too. Much cheaper than tractor chains. The perils of living in the Alaskan bush.

Saturday, January 1, 2011

The Wire Nut Horse

Wire nut Horse is the oldest Wire Nut project. He dates from September and the onset of the cold season. To complicate matters there are two of them. Let's call them v1.0 and v2.0. It would be useful to show v2.0's complete anatomy before I proceed.
As you can see, v2.0 consists of three rings, a backbone, a neck and a keel -- that would not be found on a real horse, but you need fore-and-aft rigidity. He has a wire neck, cartridge head, and nut hooves. Later he got a saddle and a rider. So how do you make him?

We begin by the three rings. Since I did these horses, I have learned another way to make rings. But I bent them around a former. For this, you anneal your wire -- heat it red hot. Let it cool, or quench it; then it will bend easily. For a while, because copper hardens when you work it.
After that picture, I learned to file away spare copper to get a nice smooth ring. You feather the edges. But anyway, you solder it with silver solder. This is hard stuff to master. You have to use a torch; I used a butane torch at left. I also used hemostats as clamps (available, of all places, at your local Wal-Mart as "fly-tying supplies") and the invaluable third hand shown holding the ring. Got it at the "cheap tools tent" which you find all over in the summer, $1.99 and no tax.

So you have three rings. Now we switch to v1.0 -- that's the sad fact of blogs, I didn't take pictures of every step when I should, and we see v1.0 pieces.
V1.0 is bigger than v2.0; he has copper tubing for a neck and a cartridge head; two legs (double wire) under construction. The torso of the horse is now apparent. Two more legs and we have to solder the beast together. A difficult job. Every time you heat it, the parts that have already been soldered threaten to (and sometimes do) come apart.
There is v1.0 horse on four legs! a big step, and the rest of him did not come apart in the heating. Now on with the neck!
Before soldering, I cut a notch in the neck; soldering needs all the mechanical help it can get. Note also 1.0's elegant tail, a piece of stranded wire I found on my walks.
He also sports a mane, also made out of stranded wire. I used soft solder for this, because the silver stuff kept falling off.

Now I return to 2.0 horse. He is much smaller than 1.0, so no mane. But he has a saddle. Here is 2.0 with his saddle.
The saddle is a piece of copper sheeting bent (hammered) after annealing. The horn, a piece of wire. Remains the rider, but while I thought I had recorded it, I didn't. It is a stick figure like the rest of the wire nuts. And a nut head, of course.

Maybe the recipient will let me get a shot of it. If not, at least you get the idea. I now know how to make rings wholesale; better late than never. And I learned that it's fun to work copper and brass; a nice change from wood.