Saturday, January 28, 2012

A Winter's walk

In winter I ski. When I can, that is. Sometimes it is just too cold. Even with hand-warmers, my hands freeze. This apparently is due to the fact than when one skis, one clutches the poles as hard as possible. It impedes circulation of the blood. We have no prepared tracks here at Chalupy. Do it yourself all the way. If it is really cold, my feet freeze too. So I have decided -25C is the limit for skiing. When it gets below that I walk. I wear my bunny boots, so my feet do not freeze. I wear my down parka with the fur hood (and a cap underneath that) so my head loses no heat. I wear my padded Carhartt overalls, wool shirt, long underwear, the works. Today it is -33C or so. At these temperatures, if you are having problems with C and F scales, it doesen't matter. Same thing, for practical purposes (the scales coincide exactly at -40). So it's cold!

Nice thing about walking: I can take pictures. Camera must be kept warm at all costs, or the batteries default on their duty. And I have both hands free. I can fish the camera out of the clothing and take a picture before my hands freeze to death. I have to remove super-mittens, though. No sacrifice too great for the blog.

So here is a winter walk in the Alaska bush. It is about 10AM -- just after sunrise in January. We walk down Basargin Drive. The first thing we see is...
... a couple of birch trees, young'uns bent double by the snow load. If it were spring we could make a greenhouse of of them! Alas, it is January. Maybe 70 cm of snow on the ground. Major project getting to these babies!

So on we go. We stop to look at what Little Lonely Lake is doing.
It looks rather blue. Maybe it's too cold! No, it is a camera problem. Too much contrast for proper color recording. It is really white, but it's in the shade. Very few snow machine tracks. What a pity (cynical smile). So on we go.
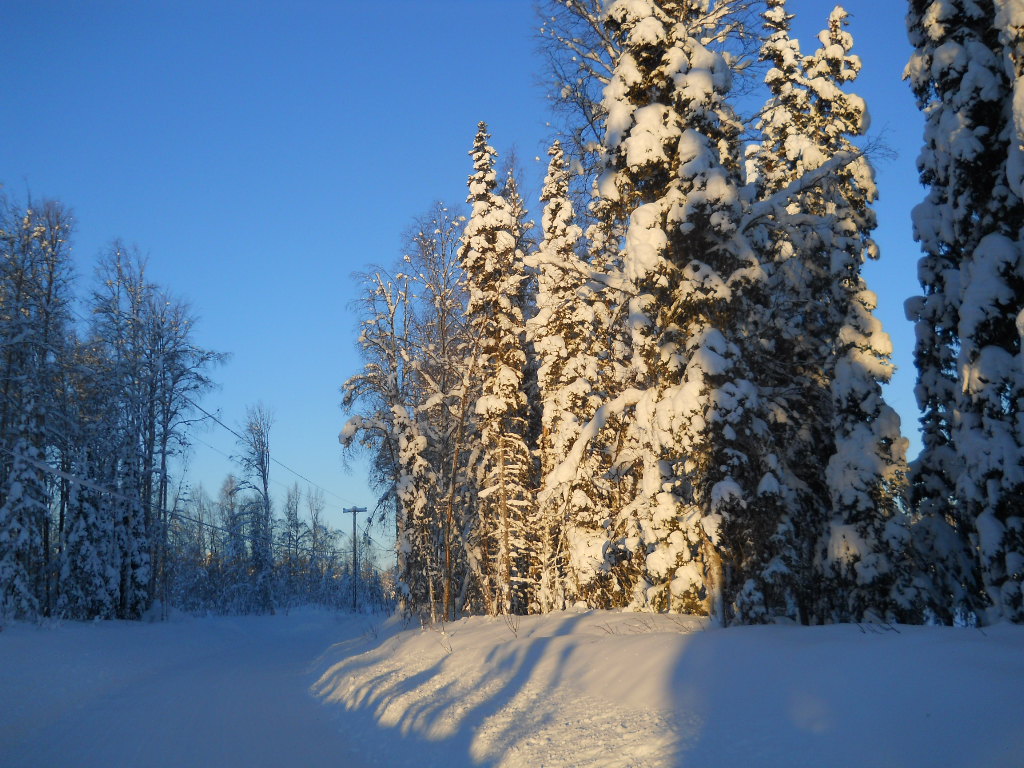
The rising sun is lighting up the roadside trees. Deep shadow elsewhere. Stunning, I think. After a while we reach one of the houses alogn Beryozova road. The name of the road is Russian (natch. It leads to the Russian village). It means "of the birches" road, very apt. So we come to non-village, but sometimes inhabited territory.
Lot of snow on the roof! The residents are not in residence. Perhaps they are snowbirds. But mysteriously their driveway gets plowed, no doubt by divine providence. Wish my driveway got done that way. Well, we turn back eventually and get home. We are glad to see our driveway.
We note that it is plowed (actually snow-blowered), but regret that Divine providence did not favor us. Sigh. Do it yourself, again. Note that the sun is just now clearing the trees. It must be 1100 hours. Nice thing is that the days are getting longer.

And so, home. Have a cup of tea, enjoy the warmth (if, that is, you remembered to start a fire that morning) and on with the rest of the day.

Wednesday, January 25, 2012

WIre Nut painter

In the continuing saga of catching up with the (wire nuts) ghosts of Christmas past we present Wire Nut Painter. This is for my son, who in addition to being a musician is an artist. So obviously...... we had to do a Wire Nut Painter. Here he is, headless. The head sports a beret made out of a .223 cartridge base.

The really hard part of this composition was the paintbrush. As I pointed out in the last post, soldering stranded wire to solid is not easy. In this case I had to solder a brush base to a solid copper wire. I haven't really figured out the thing yet, but due to some circumstances out of range of this blog, I have some ideas. Maybe next year.

Thursday, January 19, 2012

Wire nut kitties

My daughter loves to sit in her armchair and read a book. Her cats like this program, being sister Himalayans with a penchant, indeed a genius for catnapping. So for her, the Wire Nut Kitty tableau.

The hard part of this program was making the cats. They (a) have tails (b) are small and (c) they have lots of bends. So it proved essential to anneal the wire first so I could bend it. With time and bending, copper rehardens from the annealed state, but we will only bend once, hopefully.
On the soldering brick at top, a completed cat, minus the head (which is of course a nut). The tail is made out of stranded wire. This is a bear to solder. It will come unstranded and apart -- like Garbo, it vants to be alone. It also heats up more slowly than the solid stuff. By the time I got to the second kitty, I had evolved a technique: leave the insulation partway on. Clamp that in a toolmaker's clamp. This curbs the Garbo effect, and holds the tail still while you solder it.

In comparison, the rest of this composition is a breeze.
The footstool is , of course, a 12 ga. shotgun shell base and the book is sheet copper; the base is wood. The only other hard part is drilling the little nuts (cat's heads) to take the wire. I might do a post on that sometime.

Meanwhile we have hit a cold spell. Morning tempoeratures around -33C, warming up to a balmy -28C or so. More on that later.

Wednesday, January 11, 2012

Wire nut ATV, part II

Last post we had made the chassis of the RV. Time for bodywork. The body is sheet copper bent to shape. If it were more complex it would have to be hammered out (after annealing the copper) over a wooden form. A lot of work, that. So now you know why I made a bending brake back in December. I seem to have gotten a lot of mileage out of old glasses cases.
The repoussé hammer also was made at that time; it is invaluable for flattening the copper before you bend it. The rest is soldering bodywork. The headlights are, of course, .44 mag shell bases. The wheels, 12 gauge shotgun shells on copper-wire axles. Next I made the stick figure and a seat for same.
Slopped solder a lot. Had to clean it up! The stick figure has the obligatory nut for a head. Onwards to the steering wheel, which was a bit of a job. You must anneal (soften) the wire before you can really bend it well. For this you heat the wire red-hot in a propane torch and cool it. You can actually run cold water on it because copper (unlike steel) will not quench-harden. When you have it annealed it bends beautifully.

Then you bend it around a suitable former. Then you solder on the shaft.
In all this soldering the hard part is holding the stuff still while you do the deed. Hence my post back in December on Hold It!

So the ATV is more or less complete. We need to build a mountain for it to climb, of course.
Then I added a stray moose (suggested, of course). But I can't find the picture. When it turns up, if indeed I took it, I'll post again. I am always uploading my pictures to the wrong place. I am tying the wheels down to the ramp in the picture above, because it will not do for our vehicle to slip. I used, of course, lettuce wire. It is indeed well for my art that I love lettuce; it keeps me in craft material.

Saturday, January 7, 2012

Wire Nuts 2011

Now that the Christmas rush is over, I can reveal my activities. Except for one, and she lives in Florida, so you know who you are, but please be patient with me. Lot of snow on the ground, and I am reluctant to brave the 8-mile drive to the Post Office.

Anyway, this season (which starts for me in September when I start the move indoors) I went overboard with my Wire Nuts. Now everyone has obsessions. Stuff they like. So I make stick figures out of copper wire. Hardware store nuts are used as heads. The general mise en scène is supposed to convey the essence of the obsession. However, this is Alaska. So there are some more rules. Each figure must contain at least one spent cartridge, any caliber legal. Permissible materials are copper, brass, and steel (don't think I ever used it) and the last rule: it must be all either found or at worst, thrift-store stuff. So I'm metalworking. And being arty. I am doing impressions in copper. Manet, Monet, Degas and company did it in oils. Good for them. I'm not a painter.

One of our friends has a cabin in remote Eureka, AK. She is a snowmobile and ATV freak, and so she should be with a cabin in Eureka. Having done the snowmobile last year I decided to do an ATV. In fact, I set out to model a Ranger. Or a facsimile thereof. This was by far the most difficult of my projects. So here it goes. Wire Nut ATV.

In the best style of Mr David Wingrove OBE, a modeler who puts most people to shame, I begin with the chassis. When I am making these models Mr Wingrove is my constant reference. You need a picture or two to get the idea of what you want to make. Fortunately I get a lot of junk mail and I cut a picture of a Ranger out of it. Made a sketch with dimensions on it. I don't do formal scaling. I sketch and measure off the sketch. To work!

So we take some old house wire we found at the Ghost House. We strip off the plastic (not a trivial chore) and bend it into a rectangle.
For the benefit of those who would like to bend copper wire, it is no joke. It is very difficult to put a sharp 90-degree bend into copper (or any other metal for that matter). In the picture the left-lower bend is much better than the right-lower bend. Hey, I'm warming up. There are some tricks and I'll post them sometime. Now we have to silver-solder on the axles. Silver-soldering (lead-free) is much stronger than electrical solder. I have made perhaps a thousand electrical connections in my lifetime. Silver-soldering is different. You have to use a torch, an iron won't hack it. I may do a post on this technique. I use a small butane torch. So moving on...
Some more bending, some more soldering and we have a real chassis! Now we put in the engine.
This the obligatory .45 ACP shell, filed to fit the rear axle, and soldered in. Note the lettuce wire holding it in. Half the job of doing a good silver-soldering job is holding the blasted pieces together while you solder them.

Quite a ways to go, but we got us a chassis. Messieurs Manet, Monet, Degas et al would understand this. Unlike Mr Wingrove I am not making a scale model. This is an impression of a chassis, not a model. We'll tackle wheels and bodywork next post.

Wednesday, January 4, 2012

A case for cell phones

Cell phones are a blessing and a curse. The blessing is that they are everywhere. Here in the USA I know of no place that has pay phones any more. Cell phones also double as rather expensive watches -- if you have one, it tells you the time. Since most of them have some kind of GPS they would even double as a locator; but most of them have no way to read out your location. On the curse side, I find them incredibly feature-laden, all with features that I neither want nor use (such as texting), and the batteries are subject to failure without prior notice. Such was the case with mine. You have to put the things somewhere. Pocket is a bad idea. Bump something and you hit a key. Phone comes on and wastes battery. I wear my phone around my neck. But all these phones seem to lack a carrying strap attachment hickey. Forgive the rant, but it is a sore subject with me, and it's my blog, so I can rant. Once in a while, anyway.

Long and short of it is that I decided to make a cell phone case I can wear around my neck. That famous British Special Forces outfit, the SAS, recommends that anything you don't want to lose in the woods you carry around your neck. Right. Compass, cell phone, and GPS. So let's make a neck-strap case for our cell phone.

First step, obtain material. I had some old glasses cases, courtesy of Costco. They are some kind of synthetic leather, no doubt from the hide of the fabled Naugalope. So with an X-acto knife you do an ectomy of the hard plastic insert. Take out any stiches while you're at it. You have an oddly-shaped rectangloid about 20x20 cm. You carefully wrap it around your cell phone and cut it to suit. Leave a super-generous seam allowance. You will trim it later. Makes it easier to stich up. You could, of course, use real leather. You want something quite stiff, to avoid inadvertent key presses and consequent battery drain.
The above still life shows the culprit, er, I mean the cell phone, the leatheroid and my invaluable stich-it awl obtained from Lee Valley. It has been made since forever. If you do any leatherwork at all I would strongly suggest you get one.
My awl suggests www.speedysticher.com but this URL is up for sale. However, if you google on "sewing awl" you will get some useful results. All is not lost.
Link
You need to sew up one side and the bottom. Then test fit the phone. If all is well (it fits) you can proceed. Note I left enough material to make a top flap, and there will be lots of scrap so you can make a closer. I spaced these stiches by eye (it shows) but you can use a star-wheel cutter (often sold at cooking equipment stores) to space them more evenly. Then trim up the case. Scissors works fine for this leatheroid substance. Next job is to cut out a flap and a flap closer.
The flap is just some stuff left over. The closing strap is a also a leftover. I sewed it in (fabric cement did not work). The original glasses case had a velcro closure. Marvellous stuff. It has two polarities, so to speak, the fuzzy side and the hook side. So I did another ectomy on the case with a craft knife, and removed both poles from the original case. I used Super Glue to reattach them. When you do this it pays to clamp it down. At the low temperatures we enjoy in an Alaska winter, even Super Glue takes a bit to set up, so I use clamps as shown above.

And the last step is to sew on a loop of line to go around my neck. I use old fly-fishing line. But my next inkle loom project is a suitable neck strap for my brand-new cell phone case.

It is quite amazing. My battery life has gone from 24 hours to 6 days (still counting). A nice morning's work, indeed.