Wednesday, November 28, 2012

A vertical spindle for the Taig lathe

Ah, what to post. I have been very busy, but as usual at this time of year I can't tell you about it. So let's look at the Dremel atachment for the Taig lathe. Nice and neutral, nobody's getting one of these for Christmas.

Milling on my Taig lathe is a comprehensive nuisance.  I do have the Taig vertical milling attachment.  But the cross-feed screw has a very limited travel. So I have been toying for a long time with adding a vertical milling spindle. A lot of things came together this afternoon. An article in Popular Mechanics, a reprint. A lot of watching videos on watchmaking, a fascinating subject. Need a magnifying glass!  All the reading I have done on ornamental lathes. Lots of stuff.

So a long time ago I bought an attachment for the Dremel. I don't own such a thing but I have a knock-off, made in Asia. Good for them. The attachment purported to let you sharpen chainsaws, a subject of great interest to me. Dull chainsaws are dangerous. Even sharp ones are risky, but less so. This attachment , as far as I am concerned, was a waste of money. It consisted of a bracket and a plastic gizmo that screws on to the nose of your DSO (Dremel-Shaped Object). You held the bracket so's it lined up with the bar, then used rotary grinders to sharpen the teeth. But hand-held. Waste of time. You cannot hand-hold these things worth spit. I have discoursed before on this subject. Get a proper jig, or buy a chain saw grinder. I did both. But the Dremel nose and the bracket I kept.

Today I thought, "hey, if attached this bracket to a piece of 1/4" (6mm) bar with some holes drilled into it, I could mount the whole thing on the Taig milling attachment! So after some work this afternoon, we are here.

Behold the Taig lathe with vertical milling attachment. Behold also the 6mm bar. It sticks up and fouls the DSO. But really the bracket is inadequate. The DSO won't fit.  A matter of about 3mm. So I will have to make some spacers. This will allow the DSO to screw into the plastic fitting at the bottom. This may turn into a major project. But if I can do it, then I have a vertical spindle for the Taig.  Maybe I could even cut gears, at least in Brass or  Aluminum or plastic.  Then I could make a clock. Of course I would need dividing  plates. Next topic, I suppose.

Sunday, November 18, 2012

Miracles with SuperGlue

I have this project. Unfortunately I cannot tell you why I have it or what its ultimate destiny may be. This is because what I am making could be for you! Keeping this blog going in the pre-Christmas months is a major headache. However, I can tell you this. I am making bearings. I have drilled out some steel rod to 3.15 mm which is some RGU. Now I have to cut a slot in the rod. I must mill this slot. I have the Taig lathe (on which I turned the bearings). I also have the vertical milling attachment. I refuse to buy the Taig mill. For one thing it costs $600. For another I have no place to put it! So we must make do with what we have.

For those of you who do not know the difference between a lathe and a mill: in the lathe the work rotates. The cutter stays put. So you turn objects of rotational symmetry, like cylinders. A mill works backwards. The cutter rotates and the work stays put. Aye, and there's the rub. Keeping the work put seems to be 99% of milling. So I have this cylinder, drilled out; I want to cut a slot in it along the long axis. Conventional wisdom says put I the cylinder in a V-block. Clamp it down. Yes, but my V-block clamp fouls. It hits the lathe, the chuck, everything. Can't do it. What now?

So there is a solution. Use super-glue! I actually super-glued the cylinder to the V-block. Then I clamped the V-block onto my home-built milling table. The aluminum clamper is starting to bend; must replace it with steel. No matter. It worked. I move the whole milling table up and down with its feedscrew. I am using a Taig milling cutter, about 1.6 mm wide. The Milling cutter is held by a Taig collet and I must say this is the first time I have found the Taig collets useful. They usually are either too small or too large.  Anyway, note the slips of paper between the clamping fixtures. These keep things from slipping and are very effective. Thanks to Myfordboy for that tip. See his blog, cited off this one.  Great source of information.

So I cut my slot. A bit too deep, but I can deal with that. Another use for my leadscrew, when I get it done.  Really have to hand it to superglue. In the end, superglue can be undone with heat. Just heat up with a butane torch.  Modern adhesives are a lifesaver.

Saturday, November 10, 2012

Chasing the elusive thread

I knew I had a label for it. Screw chasing, that's what it was. Took forever to find it though. So today's post returns us to March and April of last year. When summer comes I move outdoors so nothing got done since then. Well, I watched  lot of thread-chasing videos on YouTube and I must say I admire the dexterity of these people, not to mention the fact that they put their knowledge out on the net for all to see. Generous to a fault. Anyway, you will recall that this label deals with cutting threads in wood. The methods range from ancient Greek techniques (cut thread with chisel) to wood taps and dies and finally chasing on a lathe. Since I want to use my Polecat this is not a trivial undertaking.


You will also recall I am cutting a 4mm pitch thread. This is very large. Most of the people on You Tube are (a) using powered lathes and (b) cutting something like 16 TPI or 1.6mm pitches. So you might say I am behind the power curve, since the smaller the pitch the easier to chase. However, we press on. We have evolved an intermediate technique. It is somewhere between the Greeks and the modern chasers. So we start out in Greek style, wrapping a piece of paper marked off in 4mm lines. It must be offset when you wrap it by one interval or you will cut circles.

Tape the paper down to your cylinder really well. else it will slip and make hash out of your efforts. Now, just like the Greeks, take your mini-dozuki saw and saw out the lines, rotating the lathe by hand. Do not try to treadle.

You do not have to saw very deep but you have to saw very carefully indeed. You must hold the saw along the lines of the spiral. Now we want to deepen the groove. For this I find the skew chisel is just the ticket, held vertically for a change.
It is important that the tool be at center height. Nice thing about having the work between centers is that you can rotate it at will. Thus we clean up small mistakes in the sawing. We get the groove as deep as we think it needs to be. So that the next tool has a path to follow. Next we really start chasing the thread.
Here is my one-point chasing tool which I cobbled up from an old piece of steel. It has a 60 deg. point. Modeled on a machine lathe thread-cutting tool. It also has some side relief. Probably not enough. Still experimenting. But we still do not treadle. We apply the tool and start forming the thread, also deepening the groove. Turn by hand.

When you get the groove deep enough you will find you can actually treadle; the tool will follow the groove all by itself. Not only that, the multi-tooth chase actually works! See previous posts. But you must treadle very slowly. This is hard to do. The temptation to bash the treadle down is overwhelming. Resist it. Any machinist knows that to cut a thread you put the lathe in backgear and take the slowest speed you have. I have no backgear, it's all my leg. It is all too easy to have the tool jump out of the groove, or dig in.

The above shots were staged for the blog. When I was working this out I had no thoughts of taking pictures. But at the end of the day I had cut a quite respectable thread on the left end of the turning.
There are problems. For one thing the cylinder has a big crack in it, making things difficult. For another it chips. I think this is a problem with the paper guideliner. Lines not exacty spaced. I can fix this. It is also a problem with my one-point chaser, I think. Need more side relief, or is that side rake? But I can now say I chased a thread on a pole lathe. Stay tuned, as usual.

And at last we have snow on the ground. Not much, about 2cm. Enough to ski on! I was so tired of walking.

Wednesday, November 7, 2012

Steady part 2.

Still on the subject of steady rests for turning long whippy pieces. Now a lathe will turn to about .02 mm or a "thou," .001 of the width of Henry VIII's thumb. What a remarkable choice of a unit. Still, in those days the King's word was the law and we have not progessed much beyond that. Anyway, when you are turning long thin pieces the whip or spring in the piece far exceeds the accuracy of the cut of the lathe. If your lathe is good to .02 mm the thing will spring a whole mm so your accuracy is gone.

So I am trying to turn the threads off of a 1/4" threaded rod. My whole objective, as I related before is to put a leadscrew on the Taig lathe to allow me  precision adjustment along the bed. Taig uses a rack-and-pinion arrangement; cheap but inaccurate. But a 1/4 (6mm) rod is very whippy. I would rather use something around 18mm but I can't fit that through the bore of the Taig. So in this case we need steadies, and you might want (or not, but I will give it to you anyway) to see the completed arrangement.
 
We have both a fixed steady rest, which I described before, and a traveling steady bolted to the carriage. Both of these arrangements need refining, but they work. The traveling steady is a casting supplied by the Chalupy foundry, AKA John, but I did the pattern. And poorly. The more work you put into a pattern (wood) the less metal you have to move. Lesson learned.

The real problem in these rests is to machine the slots for the crews that hold these things down. In fact, the whole problem of machining metal is holding the work. The actual machining is easy, if only the work will stay put. So after many trials, unseemly language, and agony I came up with something that worked.

Here it is. The Taig has been fitted with the vertical milling attachment. An end mill sits in the 3-jaw chuck. An aluminum bar and some long screws provide vertical steadiness. Two pieces of steel square, barely visible, are held by clamps to my horizontal table. They keep the work form rotating around in the table. I wish I had an end mill exactly the width of the slot, but I broke it. You are not supposed to hold an end mill in a chuck but needs must when the Devil drives, as they say. You should use collets. But none of the Taig collets will hold my end mills. So into the chuck it goes.

 I finally got the blasted screw turned down. But alas, at last minute something went wrong and the hole in the mounting to pass the turned-down portion went wayward. I am in to re-making the mounting. Grrr.

After all this precision work it was comic relief to get Polecat, my mini-pole lathe (bungee lathe, actually) running  again.

It is nice. No motor. No fussing.  Immune to power failures. Excellent cardio workout. Just turn the thing! Made some improvements.


Polecat is doing a tool handle, of course. That's why I built it. Never can have enough tool handles. The handle happens to be for an Ulu. Whose? Ah, I won't tell.  Eat your heart out.

Sunday, October 28, 2012

Steady there! Rest.

I own a Taig (q.g) microlathe. It is about 60mm center height and about 30 cm bed. It is enough for me right now, and it fits in a very small space. Now I am adding a feeedscrew (or leadscrew)  to it, following a detailed recipe at Dean Williams's page (look under leadscrew) out there on the web. A feedscrew is a long screw that allows you to traverse the carriage of the lathe by controlled amounts. Dean calls for a 1/4-20 left-handed thread; but I am using an ordinary hardware store threaded rod. Well, at some point the recipe calls for me to turn the threads off the rod. There came the rub. When I got the rod into the lathe the thing whipped around like an enraged Anaconda and bent the rod beyond repair. Now all machinists -- I am a very indifferent one -- know you can't turn long whippy stuff without a steady rest. A steady rest is just a set of fingers in a frame. Taig will sell you one, but I follow George Dyson's principle: never buy anything you can make, and never make anything you can find. Well, I did not think I'd find a Taig steady rest on my walks, so we begin the odyssey.


I happened to have the Taig wood-turning base and some wide flat (about 50mm) aluminum stuff, and that seved as a foundation. I drilled two holes for #4-40 screws in the aluminum flat, and then transferred them over to the wood-turning base. I drilled and tapped the base for 4-40 screws, a ticklish operation because it is very easy to break a 4-40 tap. It is about 3mm across. But I did it. I also drilled the biggest hole I could in the Al bar. 3/8 RGU. It will pass my feedscrew and that is what I want. Eventually I will drill it out larger, but for now it will do. The bar bolts on to the base with capscrews. If I want to turn wood I just have to unscrew them.

Now we have to make the fingers. Classic is brass. Don't have any in the right size. Use Al instead, something like 1/2x1/8  RGU hardware store stuff. Cut it with a hacksaw. Now we need slots in the fingers so we can adjust them to fit the work being turned.

I drilled a row of holes in the proto-finger. This leaves a whole bunch of metal as webs.
So I did something that the books do not advise you to do. I chucked a small endmill in the drill press and removed the webs by hand. Very difficult because my drill press does not have a quill lock. But I did it!  I do have the milling head for the Taig, but holding the work is 90% of milling and I cannot hold those fingers in the milling attachment at this time. At the end we had a quite respectable steady rest.
The slots on the fingers slide over 8-32 capscrews. Get your piece chucked, slide it through the hole in the upright, tighten up the fingers. I now have a new problem. I bought a bunch of fasteners in various sizes, mostly capscrews. Now where shall I store them? Ah, problem solved, problem created. But I have had lots of tapping practice. You can read all about tapping on the web, and in books, but there is no substitute for experience.

And of course this gadget had to have a name. Behold Steady Eddie. Long may he hold long whippy things.

Thursday, October 25, 2012

Machine shed: done deal!

The machine shed is done! The next-to-last step was to roof the thing with castoff tin.Then we moved the lawn tractor and the tiller in with them.
 
As a super step, we had a bunch of spare tarps and cutoff tin. John hung them up as protection from the snow. We feel very rich. The shed is literally a lashup, but  it will keep my machines out of the snow. Now I have to remember to drain all the gas tanks. I have just posted this on our chore list. If you leave gas over winter in your smaller machines you will get gum and varnish all over the innards. Especially the carb. I add gas stabilizer to my small-machine reserve, which helps prevent the condition. Still better safe than sorry.
 
Anyway, the machines, for the first time in Chalupy history, are under cover. Happiness is a rough and ready machine shed.

Sunday, October 14, 2012

Machine shed, rough and ready

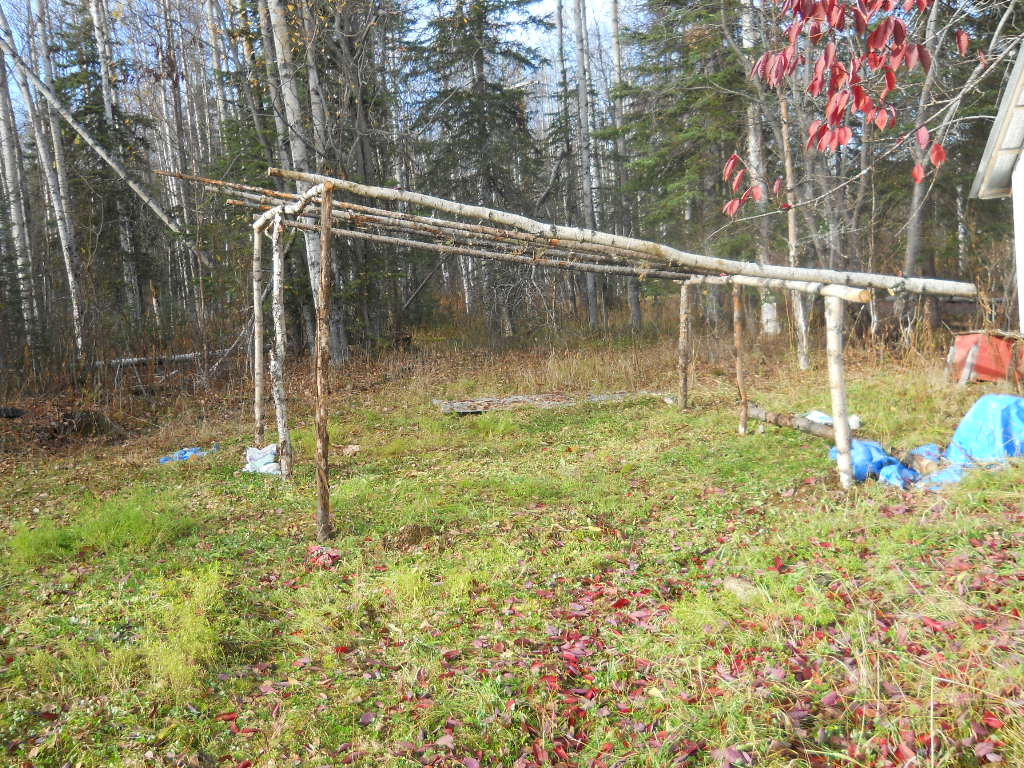
I started the summer with dreams, nay, a design, for a timber-framed machine shed/blacksmith shop. We would saw the lumber with an Alaska mill, and mortise-and-tenon the joints. Alas, the summer is gone, and nothing done. All kinds of things got in the way, from chain saw failure (Siegfried started to choke. Needs new points, probably, but hard to find) to  the Snow Splitter, which was really the priority project. Of course everything took longer than expected. So, time for plan B. We will throw up a rough and ready shed. Really rough. 5x5 meters. Low ends 2 meters, high ends 3 meters. All such projects begin with holes in the ground.
 John kindly dug the holes, 60 cm deep. We have put poles in the holes. This involved a trip to the woods and a chain saw. We got most of the poles within 100 meters of my property. We did not peel them. Hey, this is really rough and ready stuff. Next job is to nail crosspieces to the uprights. We do this on the ground. Then we lever up the structure into the holes, a la Pennsylvania barn-raising. An auf! (on up), say the Amish.


Next job is to add rafters. The rafters, of course, must be a bit longer than the five-meter length of  the shed. A trip to the woods, a chainsaw, something of an eye for what's too heavy and what isn't, and we are done.

And another view. At the lower end, the thick end of the rafters, lashings are in order. Nails not long enough, unless you use "cabin spikes" (which we used to nail the crosspieces down) and even then you have to drill holes. Thank heavens for cordless drills. 
You can see the rafters in the above shot a little better. We will nail "nailers" (crosswise to the rafter strips) to the rafters and then use castoff "tin" (really galvanized steel) available at your friendly Ghost House for free.

Now comes the icing on the cake. It snowed last night. But Lysander the heroic tractor must be gotten under cover. I agonized all morning. Can I get him to start? Almost didn't dare try. Haven't run him for over a year. Just in case I charged up Lysander's battery. It is an old 6-volt system with positive ground. Yes, positive. Lysander was built in 1941. You can tell by the serial number. So I took my courage in both hands and went on with the starting drill. Pour gas into the tank. The gas is old. It has been stabilized, but it is still two years old. Worry about it. Hook up the battery.  Remember + is ground! Take off the glass crud filter and clean it. Drop the nut on the ground and spend an eternity fishing it out. Turn on gas. Pull out the switch. A major project. Needs pliers. Pull out the choke. This thing has not started for about a year and a half. Give it a shot of ether into the air intake, cheap insurance. My fingers are freezing.  Climb up into seat. Make sure it's in neutral gear. Push in clutch. Push starter button. Lysander turned over. Black smoke from exhaust. Sput sput. Too much gas. Push in choke. Try again. Roar! Ran a little rough at first. So would you if you were over 70 years old and hadn't worked out for over a year. Then it settled down into a lovely Lysander rumble-roar. I cannot believe how well this machine is built. Anyway I drove him into the shed. I think he looks very happy there. When the pic was taken he was still running. He has a generator problem. Won't charge battery. Must worry about that, but not today.
 
Personally I think Lysander likes his new home. But this is sheer anthropomorphism. It's just a machine. Or is it? As Roger Welsch (q.g.) sagely  remarks, could it be that tractors have (gulp) souls?