Friday, December 27, 2013

The mail must move!

Christmas is over. So everyone has their presents. So now I can show some of the constructions! For my daughter I made a copper/brass mail thingie. Call it a necklace or call it a wall hanging, doesen't matter. Didn't get pictures of it. Here are some of the construction steps for another one.This is for a dear friend. It is a "necklace" of sorts. It could also be used for a wall hanging. It is made out of salvaged copper wire.  And other things.

I made a maltese cross out of sheet copper that I happened to find in an antique shop! In the middle of it is a mandala. Well, maybe it isn't really a mandala. It is in fact a piece  of a defunct VCR player, which I deconstructed. Remember those? Does anyone remember a videocassete? The coil  was so elegant that I knew its ultimate fate was to become a mandala. Sitting off to the right is the neck chain. This is a copper/brass single-strand contraption. In order to be artistic it was very, very slender wire, what bead-stringers use. One uses what one can find in Alaska. It was so flimsy I had to solder all of the brass rings. This was a lot of work, but I couldn't have things coming apart. Unseemly language was used in the construction. Contrrary to popular belief, it does not help at all, but  it eases frustration.

Fortunately my butane torch behaved itself, as it seldom does in winter. I used silver solder, much stronger than the lead solder used for electrical work.

Above, the top of the "necklace" has had a wire rod soldered to it. This will keep it from sagging. The neck chain has been tied in and soldered. I happen to like the intersection of art and technology. Just as well, because otherwise this piece would have driven me crazy.

I really like this piece. It is all proper chain mail. It is also symbolic, but I will leave this aspect to the art critics. They have to make a living too, after all.

Saturday, December 7, 2013

A post where I don't tell you anything!

Beacuse if I did tell you what I am doing it would spoil Christmas. I am making chain mail, though. I already told you that, no surprise. Fluffy is getting something different. This chain mail thing is really interesting and has lots of possibilities. But it is really labor-intensive and time-consuming. No doubt armorers in the middle ages got quite wealthy turning out these hauberk things!

But it is all great fun. Be back after Christmas, unless weather intervenes, which it usually does in Alaska. Always safe to talk about weather.

Back again soon. Your friendly armorer wishes you a merry Christmas.

Sunday, November 17, 2013

Chalupy makes Chain Mail

Now you all know what chain mail is. You have seen hundreds of movies and TV stuff, assuming you watch TV,  of various mideval or even renaissance shows, all featuring chain mail. But until very recently I had not really given it any thought.  It is all Fluffy's fault. She became enamored of Thor. We all know that Thor is a Nordic godlike figure, currently on his way to becoming a cult. . Coincidentally I had been reading, for the fifth time at least, S. M. Stirling's "Change" novels. Here evil aliens or possibly super-powers destroy the world. Electricity and gunpowder do not work. Hey, fantasy. But the survivors (they are few) have to learn how to make chain mail -- we are back to the middle ages or worse. So how do you make chain mail, anyway? I got curious. I was hooked.

There is an enormous amount of stuff on YouTube and the internet  in general on the subject. It is an active subject to say the least. For this reason I will not bore you with details. But it is a skill like any other; takes some time to acquire. Now chain mail is all about rings, right? So my first try involved making some rings. Now the YouTube and other stuff suggests that you make your stuff out of 13mm (1/2 " RGU)  wide links. So I happened to have a such an animal in my scrap repertoire. I also had a  bunch of salvaged copper wire. So I followed the YouTube directions. I did not use the jigs they recommend, nor will I.
 Instead I chucked my 13 mm rod in the lathe. I disconnected the belt, because I am afraid of taking an eye out by powering it. I wound a bunch of 12 gauge wire (salvaged, of course) onto it. The rod is called a mandrel, by the way.

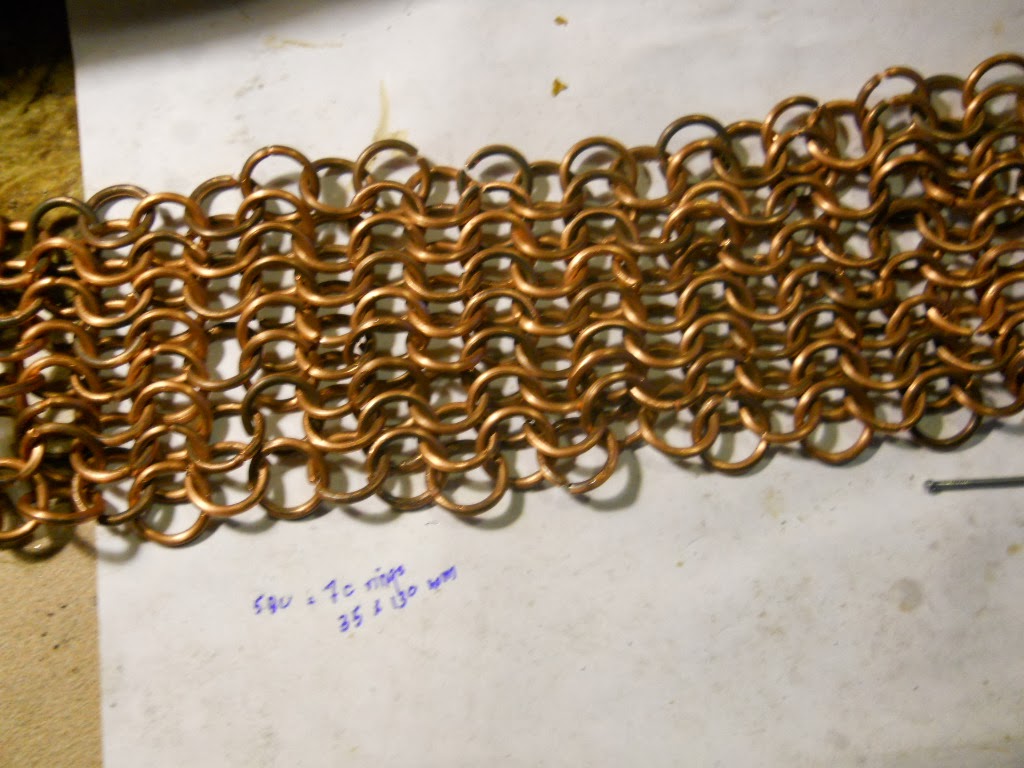
Next, the thing is cut into rings , for which you really need bolt cutters. Available at any Home Depot or Lowe's. Next thing to do is to assemble the rings intto mail  I am using a four-on-one pattern. You will find very clear directions on the 'net. The only thing I will add to that is that it is a lot like weaving. One mistake in a weave and you ruin the whole thing! It took me a couple of weeks to get the hang of it  But at the end I had quite a creditable section of chain mail. In copper (salvaged) wire, of course. This is Thor's armband, and it will eventually be a circle, because Thor, of course, has scale mail. As the Romans called it, she wears a Lorica squamata. (Tunic of scale mail). But the ends of her Lorica can be chain mail.


The tooling is really minimal. You need a couple of pliers for the stuff shown here. That's it. And, of course, bolt cutters and a mandrel of course. The YouTube videos show people making mail out of 14 Gauge fence wire. But I can already tell you this: if you make a complete hauberk out of steel wire you are entitled to charge $1000 (in today's devalued dollar) for it. It is reallly grunt work.

To say more would give my whole Christmas gig away. Sorry. You are all geting chain mail stuff, but not  Fluffy. I just exhibited your mail. You get something else.

Wednesday, November 13, 2013

The End of fall

A few weeks ago, we had torrential rain. We were flooded. We had to pump out the basement.
Fluffy is standing in on Basargin road, wearing my Extra-Tuff boots (tm), also known as Sitka Slippers. Marvellous things, highly recommended. Especially if you live in the Panhandle (Juneau, Sitka, Ketchikan, ... ). But I did not think you needed Willow Waders! Surprise. It's Alaska. The weather is, well, highly variable.
Our driveway was a little better. But not much. Actually this is "Basargin Loop" which is not a loop. Maybe it was a loop on the plans of the Village. My driveway goes off it. But since I have to get out of this loop, it might as well be my driveway. Technically it's a "private road". The Beneficient State of Alaska does not plow here. The weather allowed enough time for the tout ensemble to freeze up. Fortunately. And at long last.

On Sunday, actually Saturday night, it started to snow. Or maybe rain. Or both. One of those borderline situations. So my daughter was out here and John and Fluffy in Anchorage, and my daughter had to go to work on Monday. Hmm. By noon there was 10 cm snow. Not enough to block getting out, but enough to worry about. So we piled into her car -- Princess, a super Volvo --and drove to Anchorage. Princess is superb. I wish I had a Volvo. But not a Princess. What I want is a Valp. But due to our over-regulated existence, I can not get one legally in the USA. A pox on all governments. When we passed Big Lake it was raining and not snowing. That night it snowed and snowed. Next morning John and Fluffy went out and decided that Anchorage was impassable. I think the Glenn Highway must have been disasterville. So we stayed over.

Tuesday we started back. The roads were passable. We drove John's car Brutus, a Ford Explorer 4WD. It has really good ground clearance. I might not have made it in Vicky the Vitara. When we got here we had quite a sight.

As far as I can tell we are still 10 cm on the snowpole. This shot is south of the house. I took it today, so my ski tracks show. I can ski again! Oh joy. But the house was literally freezing (0C). so the first thing I did was to light off the heat. My oil stove dates from the flood -- brought over by the pilgrims. I love it. No moving parts. No electricity needed. No thermostat, either. If you are too cold, turn it up. Or build a fire in the stove. So by evening it was 11C in the house; much better than 0C.

Today John and Fluffy blew out the driveway.
The snow splitter is doing its job. It provides, as a bonus, a lovely place to put your skis on. It was wonderful to ski again. I love to ski. My hands froze, of course. I did not go far but I propose to take things easy at first. I would much rather ski than walk. But you can't overdo it. Not at my age, anyway.

 It is supposed to precipitate today. But this is Alaska. What the weather will do is out of human control. We will see what happens tonight.


Monday, October 28, 2013

Rain, rain and a Halloween Party

Yesterday  it started to rain. The forecast warned "heavy at times." It sure was. Our basement is flooded. We are currently pumping it out. Our hot water heater went on strike. Fortunately matters were amicably resolved. But it was hairy while the strike lasted. October has not frozen very much, amazingly; but it has been very rainy. Most unusual. The rain is a sign that it will not be too cold. After all, if it was too cold, it'd be snowing.

To distract us from these watery matters, John had a Haloween gig. Costume was the order of the day. So Fluffy went to the gig as a Dalek. Dr Who fans will know what I mean.If you don't know consult the Internet!  John and Fluffy made the costume out of odds and ends -- styrofoam balls, tea lights a paint roller and a plumber's plunger. And paint. Not far, in fact, from what the BBC (Britons read "Beeb") did with the original Daleks. Nowadays they can use graphic arts. Or 3-D printing for all I know.


John, on the other hand, opted for the chicken suit. He always said that if all else fails, including music, he'll go out and wear a chicken suit.
And wear the chicken suit he did. I cannot resist it. Fowl play, indeed. You cannot imagine the bad puns that the chicken suit has inspired. The gig, I understand, went swimmingly and there was even someone there dressed as Dr. Who!

So the Dalek was right at home. And the chicken crossed the road. And everyone was happy until it rained and rained. And fortunately the rain has let up, and maybe we can get the basement pumped out. I'm glad I bought a pump.

Tuesday, October 15, 2013

Milling around

 Looking at my labels I am surprised I don't have a label for "milling." But I do have a label for "Proxxon mill". The only mill I have, in fact. A mill holds the work still, and a cutter revolves. In a lathe it is the other way around. Both are very useful in my miniature machine shop. I have been milling (and turning) for quite a few days now, in fact is quite an obsession. My first attempts at milling have been documented. But now I want to cut flutes on the clamp bolts on my digital indicator stand.Ideally, in machinespeak, these would be knurled on the lathe. But I don't have a knurling wheel set.

 
 Instead, I took a  hint from Tom Lipton's oxtool videos and cut flutes instead. Very nice. I decided to use 8 flutes. This required making the fixture shown above. A square piece of aluminum. I scribed one line at 45 deg. By simply flipping the fixture around I can cut four flutes. Then I carefully align any one of the flutes I just cut. And I then, by flipping, cut four more flutes. My steampunk dial indicator stand is really beautiful now. And I can adjust it with my fingers. Should have a pic of it, but omitted to get one.

However, today I decided to make a fly cutter for the mill. I had a piece of very nice steel, taken from a defunct printer. It made the clamp bolts. Now I want to make a fly cutter out of the rest of it. A fly cutter is used to level out rough surfaces. I did some internet research. There is always myfordboy to the rescue. Another good reference is Dean. From these two references, I extracted the fact that a fly cutter must be angled to the work. I picked 45 deg per myfordboy. OK, I have this piece of 13mm (more or less) round bar, and I have to drill a 45 deg hole in it. How do I do this? I spent the entire morning working this out. I am no professional machinist! I finally cobbled up the setup shown below.

  
I held the round in the vise.  It is pure serendipity that the Taig milling vise (Imperial) fits the Proxxon mill (metric).  I propped it the round bar on a step block kindly provided by Proxxon. Thanks Proxxon! I packed things up with stray aluminum scrap and it all worked, a miracle because the mill is metric and the rest of it is all Imperial. But Aluminum has a bit of squish in it, so the thing was well held.

Next problem is to drill the hole. Were you to simply bear down with the drill, it would skitter all over the place. This is not wood, it is metal. So I had previously made a 2mm or so end mill out of a broken drill. Ground it to shape. I ran this end mill so it made a little step in the round bar. The step gives the drill something to bite into. So I went through with a small drill and then a 3.2 mm drill (0.125") which is a collet size I have -- standard Dremel size shank. I had very carefully drawn out the thing to scale, a very good idea.

Next step was to turn down the shank to something that would fit a 3.2 mm collet. Straightforward turning. Now I have to make a setsrew hole in the thing to hold the cutter bit. Not to mention grind the cutter bit itself! That's another day's post.

Now I have to figure out how to get a setscrew in there to hold the cutter bit down. Later.

Thursday, October 10, 2013

Fall Foliage, 2013

It is time for the obligatory scenic photos of Alaska photos. We have no maples, or oaks, or other woods in the lower 48 that turn all kinds of neat red or reddish colors, but we do have the birches and aspens. This gives Alaska a distincly yellow hue.Here is Little Lonely Lake about three weeks ago.
 I zoomed in on the leftmost part of the picture above. I was standing in the same spot. One more step, and I would have fallen into the lake!
This is the characteristic Alaska hue. The birches are just a bit yellower than the aspens, which have a slightly greener tinge, but I doubt that the pictures will allow  you to tell the difference.

As I write this, almost all the foliage is gone. Today it went to -2C, or about 28F for the metrically challenged. The Japanese maples (which are red all summer long) finally got the hint and are dropping leaves. They are optimists. Time to order fuel. A yearly ordeal with a big price tag. Next week "they" will come out and fix the chimney, so we can have fires again and warm up the house. It is a big savings on fuel oil to keep the heater on low low.

Forecast is rain and snow. I suppose that means mixed, but for us it probably means mostly rain mixed with some snow.

Sunday, September 29, 2013

The arrival of Cecil

For a long time, my machining capabilities have been limited. I did not have a mill. I did have a lathe. In a lathe, the cutter stays put and the work rotates. So you turn stuff. Candlesticks, for instance. A mill is exactly the opposite. The cutter roates and the work stays put. You mill stuff on a mill. I have a milling attachment for the lathe, seen in previous posts; but the travel is extremely limited. I made do with it for a long time, but finally Fluffy found me a tremendous deal on a Proxxon mill. Now as mills go this is micro. But my little metalworking shop (a hallway) has no room for, say, a Bridgeport mill of any size, plus the floor would collapse under its weight! Even a Chinese cheapo mill is a bit too big, plus it is very expensive. The shipping costs more than the mill!

So as soon as the mill got there, John christened it Cecil B. de Mille.

This baby is very small. Fortunately it comes with a whole lot of gadgets, among them a collet (kind of like a chuck) which accepts Dremel accessories.  So I ambled over to Home Depot when I was in Anchorage, and procured some usable cutters. Above Cecil is milling out some slots for my homemade steady rest for the lathe. I am using a Dremel router bit, which cuts aluminum very easily.

OK, time for a harder test. I must make a stand for my lightweight dial indicator ("clock"), and the hard part of that is milling out the clamps.  First thing I found out is that my Taig milling vise actually fits Cecil. The difference is only a few tenths of mm. BTW, Cecil is metric. And he has zero-able dials! Heaven at last.  One turn of the dials is one millimeter. No more of this "one turn of the dial is 1/20 inch". Lemme see. Ah yes .05 inch. Why these RGU I cannot understand. Why make things so complicated? Why use fractions at all? (Rant off now.)
Anyway, above, I am using a Dremel saw attachment to slit the clamps. Note the Taig vise. I built a table for Cecil. and will sometime soon add a drawer to it. The clamps are brass. But Cecil rips right through it. I am soooo pleased with Cecil. Thanks, Fluffy, for locating this jewel.

Wednesday, September 18, 2013

Snow Spitter 2.0, update

Our snow spitter progresses. Pervious episodes have documented the building of this contraption. Most of this work is John's. I have held tools, passed screws, and found tools. Now we get on to the superstructure.
We have added cross-beams and diagonal braces to the basic structure.  More diagonal braces to come. Note the plastic bags at the bottom of each upright.  This is vapor barrier stuff. Next is John's idea. To suppost the ridgepole use plywood. We have a big stash of outdoor plywood, kindly left behind by the previous owner of the house. Or someone. Here we are cutting a big triangle out of plywood. The big triangle will be notched to take the ridge beam, and the triangle (actually two of them) will be screwed on to the cross-beams. Plywood is amazing stuff. It will take enormous loads, because the plies in the plywood go at different angles to the grain. Nothing like free plywood.
Today John got the triangles up and the ridge beam placed. I neglected to take photos of this operation. But the ridge beam is up and running. Well, sitting, really. We very much do not want it to run. We want it to be still. The real purpose of the snow splitter, as I must have said before, is to keep the snow that slides off the roof from blocking out access to the house; save hours of shoveling hard compacted snow. This is impact loading. All the stuff you leaned in the strength of materials courses does not apply. It has to take a very sudden overload for about the one minute it takes the snow to slide off the roof. After that, the static load is trivial.

Anyway it is very pleasing. This is a much better structure than we put up last year, so we live and learn. I will add some more photos as this project progresses.

The birches have started to turn yellow. It is fall. More on that later. As usual our projects  progress JIT (Just In Time). Today it was 3C and that's warm. It got to 0.5C last Sunday. Close to freezing. 34F for metrically-impaired audiences. So it snowed in Fairbanks today. We have a very limited time to complete this project.


Thursday, September 12, 2013

You will remember our snow splitter. It collapsed under the onslaught of a thaw plus a lot of snow on the roof. If you don't remember, the relevant tag is "splitter."
So we are rebuilding the splitter. This time we used batter boards.
 A batter board is a simple framework upon which strings are set up. You adjust the strings so as to have equal diagonals. It is much easier to adjust strings than to adjust big heavy posts. You try to keep the string square, but the ultimate test is the diagonals. This is used both by constructors of big heavy structures and by cabinetmakers. If your diagonals are equal, the strucure is square, and that gets you out of a great many difficulties, because in construction you cannot rely on carpenter's squares, and the same is true for cabinetmakers. You should level the strings. I used a line level for the purpose. Then I sawed a notch in the batter board so that I wouldn't lose the reference.  Now you have corners for your framework. You dig holes at those corners.

Then (much later, like today) we set up the posts. Below, Fluffy holds up a post prior to leveling. John has rigged supports so we can plumb the posts.

 Once you have the batter boards (and the strings) it is relatively easy to set up the posts. Note that we have encased the posts in plastic bags. A bit of insurance against moisture seeping in.  We thank Fluffy's father for the advice. The posts are supported by temporary braces. Thanks, John.

And the rest is pouring concrete. So we did. A bag of concrete, high-early-strength (HES) stuff does the trick. One bag per upright post, but just in case we will add some more concrete. Lowe's is your friend. In the picture above Fluffy and John are recycling our concrete bags to provide a tent for our concrete, in case it rains tonight. It probably will. This is Alaska. Fall is rainy.  It has rained continually for the last week. This one day, it did not rain, and  we got a lot done. The posts are plumb . We will pour some more concrete as insurance, but this is a major step forward.

Wednesday, August 28, 2013

Moose, MAWS, and folkore

As I said in my last post, folklore has it that a bunch of (any flavor) CDs repel moose. Not wanting to lose any more of my garden, I went out and strung up some CDs on string all around the garden.I called it MAWS (Moose Alert and Warn-off System) in the best acronym-insanity fashion.

I only had so many spare CDs. I do not use these contraptions very often. I must say, if the wind is blowing they certainly sparkle.  I put up all I had. Would it repel moose? Often there is some truth in folklore. But not this time. When I went out next morning, all my cabbage had been cleared out. I was devastated. Mooseburger looks better all the time. So, folklore. CDs may repel moose when the wind is blowing. Not enough experimental data to confirm. But it is certainly dubious at best. Next year, a real fence, with big heavy logs, to keep out the moose. There are some consolations, however.

 From the garden, summer squash. Below, zucchini and Japanese cucumber from the greenhouse. The Japanese cucumber is a winner. Will plant again next time. And we have parsley, Cilantro, and even some very small green beans in the garden. One chard is left. It was a happenstance, there must have been one seed stuck in the Earthways seeder when I planted it. Considering  how late it the squash was planted, I consider squash  a major miracle.

Meanwhile in the greenhouse I actually have some fair-size peppers. I am impressed. The moose will at least not venture there.

Thursday, August 22, 2013

The attack of the killer moose

The perils of Alaska gardening are many. John greeted me today with the news that a pair of moose, mommy and child respectively, got loose in the garden. The good news is that he chased them (he was up early!) off and the damage was contained. The bad news follows.

Now I know that in the midwest deer are pests. Say you will about Bambi, when he eats up your hard-planted and cultivated corn, over which you have toiled for months, you begin to think that bambiburger is not such a bad thing after all. But I have been gardening here for about ten years. Only Cassius, whom I think has a label all to himself, was a pest. But Cassius was a special case, an obvious moose school dropout. We now have a repeat instance of the incident.
The broccoli is destroyed. Gone. Vanished. Eaten. It was the best broccoli I ever grew. At least we got to taste it before it was gone. There are moose prints all over everything, hope they show up. If not imagine big big prints in the mud (it has been raining for what seems forever). Amazingly the cauliflower survived. But all the leaves are gone. They left the cabbage untouched. We must be thankful for small mercies.

 Another shot of the cauliflower devastation. Moving on to row 1 (back) we see that the chard is gone, kaput, and over. I love chard. This hurts too. The beets survived, again a small mercy.
It could have been worse, I suppose. I seem to have connoisseur (or is that connosieuse?) moose. They went for the edges. And they left all the cabbage.

Conventional wisdom says that CD records blowin' in the wind will scare the moose away. I will try this as soon as the rain stops.  Myself  I would prefer #7 birdshot in the very large derriere of a moose. Nothing like reinforcing the lesson, see the Cassius posts. I would hate to kill a mother and child over anything as trivial as my garden, so #7 is the call, not the 30-30. And aim at the posterior. But you have to catch the culprit red-handed.

The greenhouse is unscathed. Another mercy. There is an ancient military saying. "Once is an accident. Two times is coincidence. Three is enemy action." Probably coined by Alexander the Great. I think it is CD time, even if it is only coincidence. Moose are supposed to be stupid. I notice they picked me, and not the Russians. That is because I am the outpost. Always attack the outpost. Maybe moose not so stupid after all. Sun Tzu himself would have done no better.


Monday, August 19, 2013

The pendulum swings

It has been raining cats and dogs. Or in Spanish, always more colorful, palos de escoba  y capuchinos de bronce. Brooomsticks and bronze capuchins. I assume capuchin Friars made out of bronze are extremely heavy. So with the rains. So since I can't go out and weed without getting soaked I have been doing some clock  stuff.

This time we will make a pendulum. The pendulum is an antique device. Galileo was the first person to document its workings, but it must have been known before that, because Galileo, smart as he was, did not invent it and never claimed he did. However, he did scope it out. He worked out the basic pendulum formula, which you can find anywhere and I will not repeat it. It is a curious fact that a pendulum with a one meter length will do a beat (the "tick" of "tick-tock") in one second. Almost. When the Frenchmen of the 18th century invented the so-called metric system (it should properly be called the decimal metric system) they considered using the length of a pendulum that beat one second as the length standard. They wisely rejected this, because they realized their time-keeping devices were crude. Instead they took a ten millionth of the Earth quarter-meridian as a length unit, AKA meter, and proceeded to measure out the length of the meridian -- a monumental undertaking by any standard. Especially during the Revolution, when surveyors were regarded as spies.

But we digress. Let us make a pendulum for the clock. We are fortunate that the major part of this is simply a commercial three-foot dowel from Lowe's. But a pendulum needs a bob. This is a heavy piece on the end of the dowel. I was fortunate to secure an offcut from one of John's projects, a piece of oak, intended as a stair riser. After a lot of staring at the drawings I finally figured it out (I think) and decided I needed a circle 80mm in diameter. So I got an offcut, marked out 80mm with dividers, and roughed it out on the bandsaw. Now we have to get it circular. This is lathe work, of course. You will soon find that if you need A you firt have to make B. In this case B turned out to be an arbor (lathespeak and not clockspeak) to hold the piece you need to machine. This took me an afternoon, but I do not feel bad about it because (a) I have an arbor for the future and (b) I learned a lot. I used a piece of very nice steel rod, taken from a defunct printer, to make the arbor. So let's put it on the lathe.
 The Taig lathe will "swing" a maximum of about 110 mm -- that is the center height is 55mm  or so(actually 2.25"). It is an RGU lathe. The bob is very close to the limit of the lathe. Wood or no. It is not only the swing, it is getting the tool to work. It took quite a lot of maneuvering with angles, tools, and general fussing around to get it down to where I wanted it, 80 mm diameter.

 At the end, we turned the thing. It remained to drill a hole 1/4" through it. This was a major undertaking. A "jobber's length" 1/4" drill can do the job. Barely. My drill press can drill 50 mm , but it is outclassed  by the 80 mm diameter. I finished it up with a cordless. And no drill goes straight, nor round.  More about this some other time.

So here's the pendulum:


The pivot is the circle on top. Then the 3' (about 94cm) rod, then a sleeve, and then a piece of hardware store threaded rod, below of which sits our bob. I will have to make up a stand, because as you can see, the pendulum is too long to clear the cart which John built for me. It's a few cm, that's all. Not too bad for a couple of rainy days. The reason for the threaded rod is rating. By adjusting the nut at the bottom of the whole thing you can adjust the beat to accomodate friction, weather, and other misfortunes.

Thursday, August 8, 2013

Clocking the clock

This year the mosquitoes have been worse than I have ever seen. I have a head net. This is how I have been able to work in the garden, walk, ride my bike, and do a few other things. But it has also started to rain. Good for the garden. Bad for outdoor work. The long and the short of it is that I have some indoors time. I have spent it on the Wood Clock. You will recall that we had gotten it to its semifinal state, but time out was taken to finish the wood. So one rainy (or mosquito-y) day I put the thing together again.

Alas, it was jammed up tighter than the proverbial drum. It really looks pretty, though. Problem is, the finishing process destroyed -- or at least seriously interfered -- with the fit of the teeth. So begins the ordeal of refitting. First thing I did was to put a dial test indicator on the wheels. This gadget is cheap and amazingly accurate -- it can be read to .0001" ( thou) or .01 mm, one "cent". It took some doing. First I had to clamp the clock to the table. Actually to the super-cart that John made for me. It is fantastic. For this I used Jorgensen screws -- wooden clamps -- on the clock itself. Then I clamped a found piece of steel to the bench. That gave the magnetic base of the indicator something to latch onto. The British call the indicator a "clock" because it looks like a clock, so I was literally clocking the clock! Americans say "dialing the clock." Same thing. I like "clock" myself.
 

With  the "clock" I found  the wheel diameters varied between +40 and -40 thou (sorry, it's an Imperial Indicator) and that's a bit too much. Lots of reasons for this. One is that the shafts, or arbors, might have warped. Another is that the humidity is much higher. Another is that the arbors are probably off center. A real menace, but a drill bit drills neither round nor to size, and this causes wobble. Lastly, the plates themselves may have warped a bit.On the other hand the pinions were plus or minus 0.010" which seemed quite respectable. I went for the wheels, since they seemed to be the main culprits.

So I went wheel/pinion pair by pair and got them to spin freely again. This is a tedious task indeed. You have to sand until everything spins. On the third wheel I had to cut the teeth deeper, and I used the invaluable Dremel for the purpose. I did say it was tedious and I do not think it redundant to say again that it was tedious.

However, at the end...

...the clock is together again. Note that the finish is gone from all the teeth. It spins freely. Any binding would stop your clock. Mr Wilding's ideas on pivots are very good. But the adjustment is critical. What we have is little pointy things (pivots) running in brass bushings, and this is a Good Idea. But if the pivots are so much as 0.1mm too short they fall out of the bushings. If they are too long they bind. The pivots must have some slop, called endshake in clockspeak. About one mm. If this is not provided, once again the clock binds. The clock has to rattle a bit. In brass this is no problem; but wood is a cantakerous material.

All the wooden clocks I have seen on the You Tube videos use steel arbors (shafts) and I think this is a much better idea than wooden shafts, even with the steel pivots. Steel does not warp as much as wood. But I followed the original plans and the book, and I learned something!

Meanwhile, I notice that nobody, myself included, can resist spinning the clock as they walk by. It is a Zen contraption.

Thursday, August 1, 2013

One month to go on the garden

The garden is growing. Not surprising, plants do that. What is surprising is that in spite of the very late start we are doing as well as we are. Here we are, August 1. August is named after a long-forgotten Roman Emperor. I digress. Let's have a look at the garden.

 Here we see the cabbages front and left. To the right, the turnips. I like turnips. John calls them "potatoes with an attitude problem." All right. I still like them. Mashed, with butter substitute. I cannot take butter any more, unfortunately. The turnips are ready and I pull them at need. Behind the cabbage is broccoli and we have little tiny brocccoli. Beyond them the cauliflower. No signs of cauling or whatever it is cauliflower does. Now looking southward we have more stuff.
 
On the left chard and beets. I checked the beets today and they are starting their beeting. Love beets, especially in borscht, which my daughter makes so very well.
Then the late potatoes. Then some summer squash. It is doing well. Then herbs. On the right, beans. Will they bean? I don't know. And some junior collards, a desperate last-minute planting. Don't know if they will get there.

In the first picture you see our greenhouse. I have some tomatoes in it, some Japanese cucumbers, some eggplant (an experiment) and some zucchini. The zuchhini threaten the world, like Godzilla. Got to do a post on that. Meanwhile, we are eating fresh lettuce daily; nothing better, all red-leaf but it was, as I have said before, a difficult spring. And the potatoes are doing just fine, thank you. Root vegs do very well in Alaska. I may have some mystery vegs somewhere here too.

For such a late start, I am satisfied. At least two weeks late. Nothing I could do about it. Us mini-farmers, and even Big Ag with their million-dollar machines, cannot modify the weather.

So we weed, and we water. And we mow the "lawn" which unfortunately today cut my hose into pieces. I really have to bury the hose, but then, what to do about the winter? Maybe some pipe; run the hose through it. Bury the pipe.  Got to think about this. How to drain it in winter? Food for thought. Meanwhile we are growing food. Nothing is more satisfying.


Saturday, July 27, 2013

Spliter v2.0: batter boards

We learned many lessons from the collapse of our Snow Splitter v1.0. One is that a snow splitter is a Very Good Idea. The other is that is has to be not just strong but square. We put in the uprights by eye. Now John has a better eye than I will ever have, but even he is fallible. So I spent the weekend building batter boards.

These are devices probably known to the Ancient Egyptians:
As you can see, the batter board is not a complex creature. One board is three stakes hammered into the ground. On these stakes are nailed pieces of board. Strings run from our ground truth, the 4x4s on the porch itself, to the boards. There is one cross-string. The thing is, it is much, much easier to move a piece of string than to move a whole foundation. From the intersections of the string you can see where your corners should be. You can measure your diagonals. If these are equal then the thing is square. Euclid strikes again.

Making these things was, however, not a walkover. The mosquitoes were ferocious. They tried to eat me. Fortunately I had a head net. I do not like being a buffet lunch for mosquitoes, and I wore long sleeves and pants. I roasted in the heat. But besides that, I found a willow tree that was impeding my lawnmowing. I cut 5 stakes out of it. Some scrap tree gave me the sixth. Work for a bowsaw. Then I pointed the stakes with the axe.  Pounding the stakes in (with the maul) was difficult, because there is gravel on some of the area covered by the boards, and it had to be dug out.  I placed the stakes by eye (my eye is far from perfect). But it doesen't matter much because the strings tell it all. String theory, they call it in Physics. I did level the boards. Then I strung up the harp of strings. All by eye. Again it does not matter. The next step is to get two people on the problem and start measuring diagonals. Takes two, one at each end of the tape. Then we adjust the strings until (a) the proper distance from the porch is met (3 meters) and (b) both diagonals are equal. Then we drop a plumb bob from the intersection; that's the center (or edge) of our post. At the end I was wet and very tired. Hard work, but worth it. And I can see that even with John's eagle eye, the posts are way out of place. No matter. They will be replaced.

Thursday, July 18, 2013

A turnip grows in Willow

I always start my tomatoes somewhere around march. So I dutifully stuck the tomato seeds into the pot, crossed my fingers, and hoped for the best. But after a while I noticed that the biggest plants in the pot (I use big yogurt containers, repurposed) did not look at all like tomatoes. I called them "Freds" after a Muppet's Christmas Special of long ago. Too obscure a connection to explain. "Classical Reference," as S.M. Stirling's Change novels say. Anyway, I had no idea of what had happened. In retrospect, I must have picked up a few strange seeds with my fingertips. So I stuck the Freds into the greenhouse along with the tomatoes. And behold, today I pulled up some turnips, because that is what the Freds turned out to be.
Surprise! Ready mid-july, even with the late planting. Well, the turnip has just gone up in my estimation. We had some of these turnips with dinner. Delicious. Of all the pleasures in life, eating food you have grown yourself has to be at the top.

As I bonus, my tomatoes have some room to grow now. Freds are fearful leafy veggies. They will choke out your tomatoes.

Saturday, July 13, 2013

Sundials, and milling wood on a lathe

About a year ago I was into (as current argot has it) sundials. I made quite a few. Alas, one of them broke. It dropped on the floor, and the bottom portion of the dial itself broke. Sigh. Although the material cost on these things is zero, I have usually put in quite a bit of time carving the numerals and marking out the dials. The one that broke was an equatorial, too. Easiest to mark out,  hardest to get the inclination just right. The stylus (the pointy thing that casts the shadow) must be exactly parallel to the polar axis of the earth. That is, it must tilt at an angle equal to your latitude (62 deg in my case). Well, I decided to repair it. So the bottom part of the semicircle that forms the dial had broken off. I built a replacement piece out of scrap wood, and then I cut a groove in it with my tiny Lee Valley rabbet plane. Now I had to make the dial fit into the groove. So I set it up on the Taig lathe with a milling attachment.

The real problem with machine tools is not the machining itself. It is holding the blasted piece down while you machine it. The forces exerted by the machine are enormous, and will slew, jiggle, or skew your workpiece out from under you. As you see, I have an end mill held in the chuck of the lathe. Poor practice, by the way, but I have no collet big enough to hold the end mill. Bolted to the milling attachment on the lathe is the invaluable milling vise I got for Christmas. Thank you, my children. But to hold the dial still, I clamped a scrap board in the vise. This gives support to the dial. It is also clamped by the vise. There is a piece of paper under the vise. It miraculously keeps things from slipping, don't ask me why. Thanks a million to myfordboy for the tip. In the foreground, the slottted piece I must fit. Later I will cut it to shape. And to the scrap board I have attached a pair of very small C-clamps which (by serendipity) I found at a flea market a couple weeks ago. Very small clamps are hard to find. Now the dial is stable and I can mill it down to fit the groove in the slotted piece. I am actually routing on the lathe. Only we call it milling!

In the end it does not look so bad.

The stlylus now needs to be lengthened, or a new stylus made, because the shadow it casts is too short. Haven't decided yet what to do. But it was interesting, if not high-tech. And I didn't have to carve a new dial, which takes forever (art, not science).

Friday, July 5, 2013

Garden report

From a completely dry and overheated June, we have gone to a rainy and cold July. The weather is of course crazy under the best of circumstances, but this is unprecedented. The rain did not seem to hurt the garden outside.
 The outdoors garden is coming right along. The cabbages in particular, nearest to the camera, are doing very nicely. Cabbages do very well in this state; people routinely grow 40 Kg cabbages. I doubt that we will do so well! Of course, the monsters are freaks, grown entirely to win prizes at the state fair. That is not our objective. Meanwhile, a shot of the greenhouse.
Foreground two tomatoes bought at the remnant sale at Fred's Grocery store, when things looked desperate in the heat. They are doing rather well. Background, one of this year's experiment, eggplant. It is not usually grown in Alaska, most certainly not outdoors. One zucchini that survived the heat wave is next, and some new (seeded) ones poking up. Desperation measure, to seed zucchs, but no alternative.

On the left of the picture you can find cucumbers, peppers, and some strange root vegetables that crept, unobserved, into my tomato plantings. Godzilla strikes again. Much work yet to be done, but at least we are up and running. It is race with time.  We are at least two weeks late, couldn't help that, so what comes out remains to be seen.


Wednesday, June 26, 2013

Mosquitos and machinery

If you live in rural Alaska you will soon find out that mosquitos (actually Spanish for "small fly") are the bane of your existence. There is a story that when they were building the Alcan highway back in WWII, a mosquito landed at an Air Corps (as it was then called) airfield. The mechanics rushed out and refueled it. They thought it was a very large bomber.

Due to all of the really weird weather (blame the PDO, of course) our mosquitos have been horrific. Now one way to keep these vampires at bay is Deet. It is a shorthand for some fearsome chemical, and it does indeed keep mosquitoes at bay. Whether it is good for you is undetermined. I suspect not, but the alternative is 10,000 bites per second and that is not good for you either. The **** mosquitos are really bad this year.

Besides Deet, there are a number of things that you can do. One of them is to invest in one or more Buffy rackets. These are battery-powered contraptions that look like tennis rackets. I must do a post on Buffys someday. With this, you can fry the indoors mosquitos.

But a very important part of the anti-mosquito campaign is mowing your lawn. This cuts down on the habitat of the loathsome creatures. (My "lawn" is mostly dandelions. Let us ignore this detail). For years I did this by hand. Well, with a push motorized mower. It took days. Then I broke down and bought Achilles, the riding mower.
The only trouble with Achilles is that eventually the blades must be sharpened. Since the deck sits so close to the ground, it is impossible to get the blades out. On a regular power mower you turn the thing upside down and get the blade off. Achilles weighs at least 100 Kilos (200 lb to metrically-impaired persons) and upside-down is not an option.So aided by John, a makeshift ramp was rigged. With this and some improvising (and a big piece of pipe to act as a lever) we were able to get the blades off. From there it was a SMOS (Simple Matter of Sharpening) and I need few lessons in that direction.

There are lots of videos on the subject on YouTube. Unfortunately none of them is geared to Rural Alaska. Hint: not all of us have $800 air compressors and $50 pneumatic impact wrenches. Be real, you-tubers. Not all of us live in Groton, CT or even Palo Alto, CA. Not even Grand Forks, ND. However, one video was a real help. It is a simple tool that holds the blade still while you take the nut off. The nut is some insane Gringo Size, 15/16" for all I know (1" slips).  I will see if I can duplicate that tool.

However, we got the blades back on today and I mowed. Ahhhh. Mosquitos have temporarily disappeared. So nice to have sharp blades. Another temporary victory in the man-mosquito war. The mosquitos have disappeared. It is ephemeral. Insects, in the long run, outlive us all.

Wednesday, June 19, 2013

We are planted!

It has been a hectic ten days. The weird weather, of course. Well, that's the PDO; we summer farmers must adapt, since we surely cannot change the weather. So we got the garden planted!
Of course the transplants went into shock mode. They wilt.

The worst part of all this is that the temperatures have been above 32C (90+F) since before Sunday last when I finished. My transplants have been struggling. I water every day. But in the greenhouse the Zucchini have been cooked. Other transplants are stuggling too. Too bad, they were splendid. Couldn't hack the heat (although we are told that zucchini is a greenhouse crop). I have a feeling that all our lore is out of date. For the next 30-odd years we will have very different weather.

On the other hand I put in some peppers and they have stood up better than most. Good grief. They probably love the heat. Still too early to tell. Meanwhile I water every day and keep fingers crossed. I can see why the ancients sacrificed to diverse gods. Weather is out of your control. Maybe the gods, or godesses, will do something better. Ops, Roman godess of the harvest, sounds like a good candidate (from her name we get opulence). Perhaps I should build an altar. But there is stilll a lot to do! Ops may have to wait for her altar.

Thursday, June 13, 2013

More garden antics

It has been a frantic week. We are so late on the garden. So I have been spading and then spading some more. Agriculture is a labor-intensive activity. Today John and Fluffy went to the "sanderia"  i.e a place where we can get sand. Free. I am adding sand to my garden, which is mostly silt kindly deposited by the Susitna glacier quite some time ago. It is very poor soil. So I add sand. This helps the clumping tendency of silt. I add manure, and of course lime (usually; but do not lime the potatoes!). John also kindly covered the greenhouse. This year I am going backward. I usually do the transplants, then seeding, then greenhouse. This year I am doing it backwards.

This afternoon the greenhouse beds are ready to go.

 Our greenhouse is totally homemade, of course. I have mentioned it before. It is prepared for planting and tomorrow (I hope) I plant. Tomatoes, Zucchini, and the rest. I think I've got some cucumbers. All these are greenhouse crops in Alaska.
 
The outside beds have been spaded (oh, the labor... and the weeds). Today I did about half the manuring, tomorrow lime and go. I hesitate to say this but maybe this weekend we can plant.  There are two new rows to be added but that can wait. We are so late. There was no choice in the matter. It was a fiendish spring and we had to wait on it. Agriculture is a chancy business.

One of these days I must do a post on the perils of compost making in Alaska. Not quite like the lower 48.

Wednesday, June 5, 2013

Garden at last!

As I have said before it has been incredibly wet. Our driveway is still iffy in spots. The garden was a morass. Usually Memorial day weekend is planting time, but not this year. You never realize how weather-dependent agriculture is until you do it yourself.

But Monday I went out there and tested. It was OK.  Really a bit too wet, but that has its upside: the weeds come up quite easily. The first crop was already there: the dandelions. Actually they are very good for you. The leaves can be added to salads when they are young; they give the salads a real boost. After that, you have to cook the leaves; they are bitter but vitamin-rich. The roots make a coffee substitute, but I haven't tried that one yet.

So I took the spading fork and went to work. The objective is to remove the  weeds and break up all the clumps. One could, of course, use a tiller. But tillers are rather violent creatures and I prefer to do this by hand, although it is backbreaking labor.
I have four rows. I have done two and a half. They still need to have manure spread on them. Maybe some sand to increase the "tilth" because our basic soil is 100% silt from the Susitna glacier. Maybe some other organic matter will be added. Then there's the small business of planting. We are two full weeks behind time. No remedy. We will have to trust for the best. It has been an unusual spring. I don't try to keep up with the Joneses, but nobody in the village has planted either. And they have been here much longer than I have.

Well, at least today the sun shone for a while. I have my fingers crossed.


Thursday, May 23, 2013

Spring is here. Well, maybe not so much

It has been an extremely long winter. Then again, human memory for climate is short. Perhaps 30 years. I had a professor, long ago. Dr Helmut Landsberg. Prof. Landsberg had actually studied the human memory for meteorological events, such as hurricanes, floods, and even seasonal changes. That's whence I got the thirty year thing. We have a very selective filter, and anything intergenerational escapes it.

But this has been the slowest spring I have seen since I came to Alaska in 1999. Today I did a photo-op on our spring. First thing I did was go out to the garden. It is traditional in Alaska to plant on Memorial day. Not so much, this year. So I did a photo-op on it.
 First thing I did was to go to the garden. First, you can see the snow still on the ground in the background. Second, the garden is muck. I sank in 3 cm. No way I am planting this weekend. What fell effects this may have on my internal economy remains to be seen. Short growing season!
 
 Next we have the driveway. It is clear, but you see that snow patches linger on. Substantial snow patches. Bummer! I have never seen that much snow on the ground this late. Onwards.
Basargin loop, on which I live -- and have to maintain -- is a morass. It can be passed with 4x4 but is very iffy. But there is worse. There is the Basargin Road tank trap, a photo of which appears below.
At least we will have no Panzers coming through any time soon. The tank trap is impassable -- absolutely impassable-- by any vehicle  with less than 30 cm ground clearance.  Holes too deep. This excludes poor Vicky Vitara from making the passage. Notice that the villagers have dumped scrap wood all over the place in a futile attempt to improve things.  Notice the low-clearance car prudently parked on the Goat farm property. Neil is no fool! The only solution I can see is to corduroy the tank trap. One would cut logs to road width and put them down in close contact. This is a major undertaking. It involves chain saws and a lot of backbreaking manual labor, putting the logs in close contact. It is easier to let Ma Nature do the work and dry it out.  That is not happening with any speed.

However, this week I abandoned clocks and did some bicycle repair work.  I now have two functional bikes. This winter, the machine shed collapsed on one of my bikes (the best one, of course) and turned the rear wheel into a pretzel. I salvaged the axle and put it on my second bike, which had a broken axle. So not all a loss, and I am learning a lot about bicycle repair. More later, of course. I hope.


Tuesday, May 14, 2013

Creeping up on a new clock

First of all you should be aware that the wooden clock is alive and well. It is being finished at John's cabable hands. There are a whole bunch of fiddly parts that have to be finished.And there is still the pendulum, and the weight, and the pulleys. Lots of stuff to do. The backbreaking work is over, though.

But until they are finished, I can't work on anything else. So, as I have said before, I am jump-starting my next clock. This is the Isaacs clock.

The real problem with making clocks is making the wheels, i.e. gears. The real problem with making wheels is the wheel cutters. So since my last post I have been obsessed with making cutters, I am following a page which I supplied before, so I will not bore you with the details. I will say that it has been quite difficult. Now you could order these cutters form Mssrs. P.P Thornton in the UK for a modest 40 UKP apiece. Gulp. No. I must make my own cutters.

The cutters in question are described in Dean's pages, which I linked before. THe trouble is actually cutting them. Of course, I am not using "1/8 tool steel" as Dean suggests, because this is Unobtanium in Alaska. So I am using an old lawnmower blade. Very tough stuff.  It resists even my carbide tools. Plus it is an interrupted cut. The lathe tool cuts only sometimes. Since it it made on an eccentric arbor, that is, the center of rotation does not coincide with the center of the tool, it is very difficult even with carbide tools, which is what I am using. I persevered. I learned. Next time I will use my newly acquired angle grinder to rough the thing out. These things are at the extreme limit of the Taig lathe.

In the meantime, I read, on a clockmaking forum, of the equipment of some fellow clockmackers. This included a gentleman with an 18" South Bend lathe. That's about 450 mm swing and would have breezed through the cuts that strained my 55 mm lathe. Wish I had an 18" South Bend. "I like to take big cuts," said the owner.

But eventually, about a week or so later, I wound up with a cutter blank.
This image is a little confusing. There are four holes filled in with JB-weld. They don't count. The ones that do count are really half-holes. Notice the shape of this thing. It is a sort of a square with rounded sides. That is the effect of the eccentric arbor. The rounded sides provide relief.  See Dean's page, previously cited. It took forever to get to this point.

However, we got there. The next stage is to make a form tool to shape the cutter teeth.

This whole thing is unwinding the Industrial Revolution. You need A. But to make A you need to make B. But to make B, you need to make C... and so on.  Either that, or pay Mssrs. P. P Thornton Ltd. forty quid for one cutter. Ouch. I will make my own, and and a very interesting experience, too. A fine fate for a recycled lawnmower blade.