Showing posts with label model canoe. Show all posts

Friday, December 3, 2010

Tippecanoe (no Tyler) II

Well, I have done enough miniature plane work (nonsense. I am rebuilding the rabbet plane now) so it is time to return to Tippecanoe, or Tip for short. My digression with planes was due to the fact that I had to plane the ribs of the canoe to 1x3 mm. This is kinda small. As it turned out, the only way to get the ribs in place is to steam them. The evolved procedure is (1) make a paper pattern. This will give you the right length. Otherwise you will have to take out and recut (and worse, put in) the silly things until they snap into place. Paper is much easier to do than strips of wood. (2) Rig a steamer. My steamer is a piece of plastic pipe with a wire-mesh plug (keep the strips out of the water) stuck into my teakettle. Works. (3) Extract the strip from the steamer. Very hot. Try to pre-bend it. (4) With tweezers and a hemostat get the rib placed. This is an exercise in patience. Being springy it loves to spring out; start all over. (5) Be high-tech. Anchor it with super glue. Forget regular glue. Takes too long to dry.
Above, Tip's ribs are in place. I have made two thwarts -- all canoes have thwarts, and some people sit on them, but long ago I learned to kneel to paddle a canoe. After that, it is all needlework. I made a curved needle for the purpose; I heated it and bent it (if you do that cold, it will break!). So I had a U-shaped needle. Don't need it amidships, but you sure do at bow and stern. After that, it's all stitching. I finally got smart and anchored the stiches with superglue. Tip has about a dollar's worth of superglue in him.
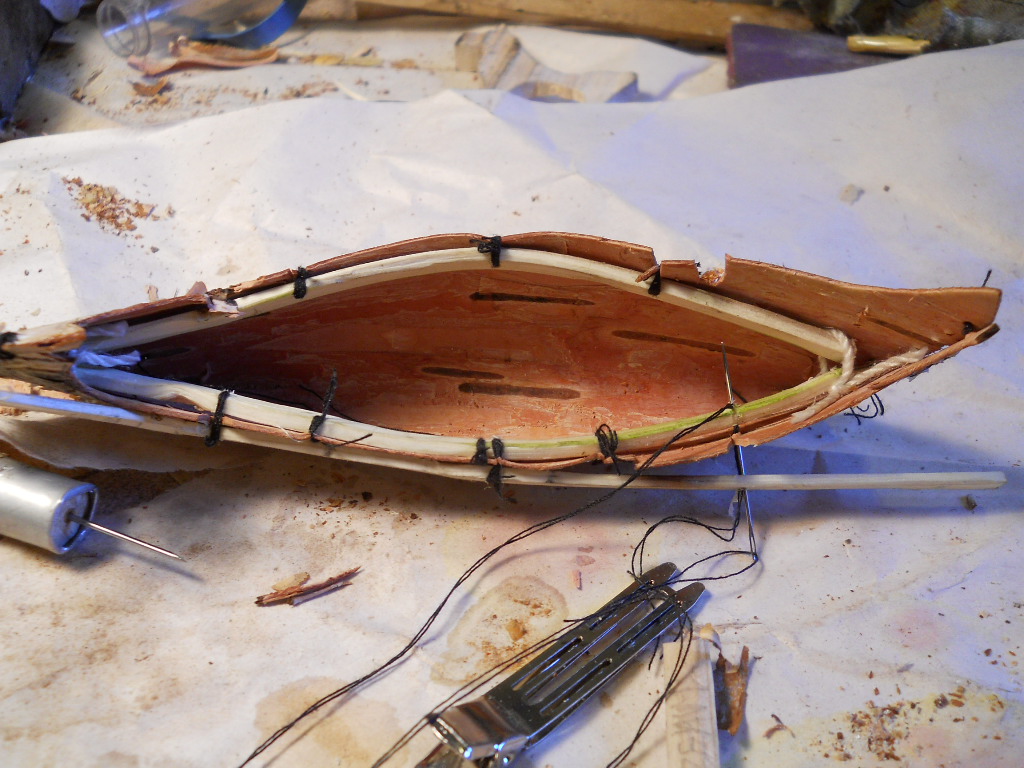
There he is, complete with paddle. The tools of the trade lie about. You can just see the curved needle stuck in the spool of thread.

I was trying to learn how a birchbark canoe is put together and I learned a good deal. Tip's bottom is far from flat. I did not use a bottom former, so Tip would float but not be too stable. The next canoe model will try to account for this, bottom former and all. But it's all good fun, except when your rib snaps out after you have put it in. I wonder how you say %^&_%** in Ojibway?

My troubles are not unique. Dr. C. Nepean Longridge built a 1/4 scale model of the Victory, Nelson's flagship at Trafalgar (preserved at Portsmouth UK). He wrote a book on it, The Anatomy of Nelson's Ships, which I have (q.g.). It took him 12,000 hours or so. The model is some 7 ft long; over 2 meters. And even on such a monster, he had a lot of troubles! The book is wonderful, jam-packed with tips and tricks, and withal very modest. The trouble is that our fingers are not to scale!

And as a final note on the marvels of modern marketing, hemostats (made in Pakistan) are available at Wal-Mart. Yes, Wal-Mart. You have to go to the fishing section, where you find them sold at $3.50, labeled "fly-tying pliers." Sure. I have to tie some flies this winter too. Hemostats will come in very handy.

Wednesday, November 17, 2010

Tippecanoe, without Tyler too

I have been setting up the Navajo loom for a new ruglet, and it is really mind-boggling. I'll report on that later. Meanwhile, I came across a reference to birchbark canoes on Bodger's forum. I needed a break from the loom, so why not build a model canoe? Tippecanoe and Tyler too. Now, most boats, from very small to very large, are built on the idea that first you build a frame and then you put on the skin -- planking, sealskin, whatever. But not a birchbark. Here, you are supposed to build a canoe form. Then the birchbark is shaped into the form, probably with the aid of boiling water. The hull is built inside the skin. The frame, gunwales (pronounced "gunnels" for some obscure reason) are sewn on to the skin with spruce root "thread." Well, OK, I said, a "model" will give me an idea of how this goes. So I grabbed a piece of paper, drew a canoe, cut it out, and cut birchbark (of which I have a substantial amount from firewood splitting).
Behold, a pattern and likewise behold the skin. It was obvious that it wasn't going to bend. So I planed it down with my trusty palm plane (at left). At this point I decided, most unwisely, that I didn't need a canoe form. So I started sewing up the skin. As it turns out, this project is mostly needlework!
One of the main reasons you need a canoe form is that it holds the blasted thing while you do things to it. But here is Tip, now a canoe, being stiched. Ordinary needle and thread, because spruce root is obtainable but much too large for this tiny model. Sewing is quite tedious. Once Tip was stiched fore and aft, I made a start on the gunwales. There are two of them, one inboard and one outboard. I made the inner ones first:
These are actually lilac gunwales! Prunings from the lilac tree. I shaped them with knife and miniature planes, then boiled them for a few minutes, Above is the hull plan, which has now morphed into a canoe form. I then sewed the gunwales into the hull.In retrospect I should have been more patient and done the outboard gunwales before sewing; then I wouldn't have to sew twice. Learning experience. Note that I now do indeed have a canoe form. Well, let's do the outboard gunwales. They have a big bend at the bow. At this point the jigs started to multiply.
Here is lilac strip, planed, boiled and shaved so it will bend. The tools of the trade are scattered about; my idea of still life. Next step is to sew Tip's outboard to inboard gunwales. All this sewing requires a very small hole to be bored; you can't go through this stuff with a needle alone. I'm drilling about #35 Morse through two gunwales and one birchbark, using a jeweler's push drill; a marvellous aid to miniature work.
I started Tip on Monday; it is now Wednesday and here's Tip's status picture:

As you can see, the gunwales are in place. Bow to the right. I have started fitting the ribs. It is quite difficult to plane the ribs thin enough to fit in, even with boiling. I'm down to about a mm.

Tip is really not a model. Proportions wrong, for one thing. He is a test bed for construction techniques. It is much easier to build a model than a full size version, and it's -15C outside. Much too cold for a canoe. So I'm enjoying Tip, and will report as I go along.