Thursday, May 23, 2013

Spring is here. Well, maybe not so much

It has been an extremely long winter. Then again, human memory for climate is short. Perhaps 30 years. I had a professor, long ago. Dr Helmut Landsberg. Prof. Landsberg had actually studied the human memory for meteorological events, such as hurricanes, floods, and even seasonal changes. That's whence I got the thirty year thing. We have a very selective filter, and anything intergenerational escapes it.

But this has been the slowest spring I have seen since I came to Alaska in 1999. Today I did a photo-op on our spring. First thing I did was go out to the garden. It is traditional in Alaska to plant on Memorial day. Not so much, this year. So I did a photo-op on it.
 First thing I did was to go to the garden. First, you can see the snow still on the ground in the background. Second, the garden is muck. I sank in 3 cm. No way I am planting this weekend. What fell effects this may have on my internal economy remains to be seen. Short growing season!
 
 Next we have the driveway. It is clear, but you see that snow patches linger on. Substantial snow patches. Bummer! I have never seen that much snow on the ground this late. Onwards.
Basargin loop, on which I live -- and have to maintain -- is a morass. It can be passed with 4x4 but is very iffy. But there is worse. There is the Basargin Road tank trap, a photo of which appears below.
At least we will have no Panzers coming through any time soon. The tank trap is impassable -- absolutely impassable-- by any vehicle  with less than 30 cm ground clearance.  Holes too deep. This excludes poor Vicky Vitara from making the passage. Notice that the villagers have dumped scrap wood all over the place in a futile attempt to improve things.  Notice the low-clearance car prudently parked on the Goat farm property. Neil is no fool! The only solution I can see is to corduroy the tank trap. One would cut logs to road width and put them down in close contact. This is a major undertaking. It involves chain saws and a lot of backbreaking manual labor, putting the logs in close contact. It is easier to let Ma Nature do the work and dry it out.  That is not happening with any speed.

However, this week I abandoned clocks and did some bicycle repair work.  I now have two functional bikes. This winter, the machine shed collapsed on one of my bikes (the best one, of course) and turned the rear wheel into a pretzel. I salvaged the axle and put it on my second bike, which had a broken axle. So not all a loss, and I am learning a lot about bicycle repair. More later, of course. I hope.


Tuesday, May 14, 2013

Creeping up on a new clock

First of all you should be aware that the wooden clock is alive and well. It is being finished at John's cabable hands. There are a whole bunch of fiddly parts that have to be finished.And there is still the pendulum, and the weight, and the pulleys. Lots of stuff to do. The backbreaking work is over, though.

But until they are finished, I can't work on anything else. So, as I have said before, I am jump-starting my next clock. This is the Isaacs clock.

The real problem with making clocks is making the wheels, i.e. gears. The real problem with making wheels is the wheel cutters. So since my last post I have been obsessed with making cutters, I am following a page which I supplied before, so I will not bore you with the details. I will say that it has been quite difficult. Now you could order these cutters form Mssrs. P.P Thornton in the UK for a modest 40 UKP apiece. Gulp. No. I must make my own cutters.

The cutters in question are described in Dean's pages, which I linked before. THe trouble is actually cutting them. Of course, I am not using "1/8 tool steel" as Dean suggests, because this is Unobtanium in Alaska. So I am using an old lawnmower blade. Very tough stuff.  It resists even my carbide tools. Plus it is an interrupted cut. The lathe tool cuts only sometimes. Since it it made on an eccentric arbor, that is, the center of rotation does not coincide with the center of the tool, it is very difficult even with carbide tools, which is what I am using. I persevered. I learned. Next time I will use my newly acquired angle grinder to rough the thing out. These things are at the extreme limit of the Taig lathe.

In the meantime, I read, on a clockmaking forum, of the equipment of some fellow clockmackers. This included a gentleman with an 18" South Bend lathe. That's about 450 mm swing and would have breezed through the cuts that strained my 55 mm lathe. Wish I had an 18" South Bend. "I like to take big cuts," said the owner.

But eventually, about a week or so later, I wound up with a cutter blank.
This image is a little confusing. There are four holes filled in with JB-weld. They don't count. The ones that do count are really half-holes. Notice the shape of this thing. It is a sort of a square with rounded sides. That is the effect of the eccentric arbor. The rounded sides provide relief.  See Dean's page, previously cited. It took forever to get to this point.

However, we got there. The next stage is to make a form tool to shape the cutter teeth.

This whole thing is unwinding the Industrial Revolution. You need A. But to make A you need to make B. But to make B, you need to make C... and so on.  Either that, or pay Mssrs. P. P Thornton Ltd. forty quid for one cutter. Ouch. I will make my own, and and a very interesting experience, too. A fine fate for a recycled lawnmower blade.

Saturday, May 4, 2013

Fixin' to get ready on a new clock

By now you are well aware of my current obsession with clocks. Our wooden clock is in the capable hands of John, who is finishing my wooden stuff. There is very little left to do on it. Actually there is quite a bit; but it is not difficult. So I have cast around for a new clock. I found the Isaacs Clock. This is a beginner's clock, and I am really the rankest beginner. I found it on the fascinating Dean's website. I am now tooling up for the Isaacs clock.


Lot of stuff there. Look for Dean's clock project. Not the least of the atttractions of this project is that I can do it on my Taig lathe. The original article is under the Yahoo horology group. I went and found the article. It is scan (not always very good) of an article which appeared in Model Engineer, date unknown, by the looks of it.  I downloaded the article, in about nine parts. After a cursory scan, it was immediately obvious that to cut the wheels (gears) on this thing I would need a new dividing plate. I needed 100, 96, and 30 holes. So my first job was to make a new dividing plate.

There is a lot of stuff on making dividing plates. A dividing plate is an indexing device. It allows you to rotate something by a very carefully calculated amount. The big boys use worm and gear dividing heads. This is a very expensive alternative. I use a PostScript program that I wrote long ago to give me a paper template. I paste the template on to the final material. Some people use brass. If I could find it in Alaska at all, I would use it. But it is Unobtainium in Alaska. So I use Acrylic. I have a large supply of some stuff I found thrown away, long ago.  I made the inner ring 60 holes. A very useful set of holes. For 30 holes I use every other hole of the inner ring.

I then paste the template on the acrylic. Cut it to rough shape. Using my faithful Veritas optical center punch (q,g.) , I centerpunch the holes. Then with great care I drill 1.5mm holes in the plate. Hint: keep the paper side up. Else you will get a distorting lens effect, caused by the fact that acrylic is transparent.

Next job. This is complicated. We have to make a cutter for the gear teeth. But in order to make the cutter we have to make a jig to make the cutter. The first part of this jig is the base. Dean, above, used brass. Unobtainable. So I used a scrap piece of steel I picked up. You will not understand this at all unless you look at the article I followed, also at Dean's site.Maybe after you look at it you will still not understand it, but for sure I will not duplicate Dean's crystal-clear instructions.

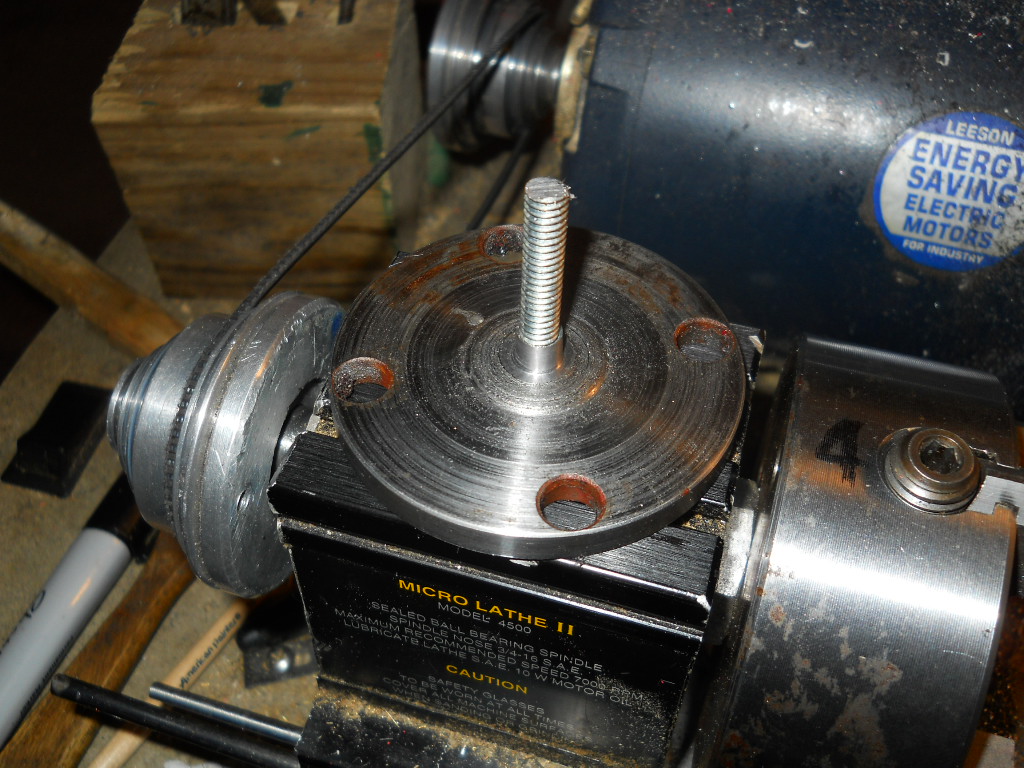
Here I have turned the piece of scrap to a nice round shape. It was not easy. After that, drilled a hole in the middle of it (and each of these steps is quite an oddysey)  and tapped it. Due to the fact we live in Gringo-land I used a 1/4-20 tap, I wish I had 6mm x1 instead, and stuck a piece of threaded rod in it, and put a nut on top of it. The threaded rod and nut are hardware store stuff. Next step a bit harder.

Got to turn down nut thing round. To what diameter? Well, I looked at what was around on the web. Dean pointed me to an article by one Mr Creed, who may be found on the Yahoo Horology group, I believe. In this article, Mr Creed suggested 7mm diameter. Most commercial cutters use this diameter. OK, said I. A fateful decision. Above I have turned the nut down to 7 mm.  The base is complete. Or so I thought.

Never that simple. But that is another post.