This year the mosquitoes have been worse than I have ever seen. I have a head net. This is how I have been able to work in the garden, walk, ride my bike, and do a few other things. But it has also started to rain. Good for the garden. Bad for outdoor work. The long and the short of it is that I have some indoors time. I have spent it on the Wood Clock. You will recall that we had gotten it to its semifinal state, but time out was taken to finish the wood. So one rainy (or mosquito-y) day I put the thing together again.
Alas, it was jammed up tighter than the proverbial drum. It really looks pretty, though. Problem is, the finishing process destroyed -- or at least seriously interfered -- with the fit of the teeth. So begins the ordeal of refitting. First thing I did was to put a
dial test indicator on the wheels. This gadget is cheap and amazingly accurate -- it can be read to .0001" ( thou) or .01 mm, one "cent". It took some doing. First I had to clamp the clock to the table. Actually to the super-cart that John made for me. It is fantastic. For this I used Jorgensen screws -- wooden clamps -- on the clock itself. Then I clamped a found piece of steel to the bench. That gave the magnetic base of the indicator something to latch onto. The British call the indicator a "clock" because it looks like a clock, so I was literally clocking the clock! Americans say "dialing the clock." Same thing. I like "clock" myself.

With the "clock" I found the wheel diameters varied between +40 and -40 thou (sorry, it's an Imperial Indicator) and that's a bit too much. Lots of reasons for this. One is that the shafts, or arbors, might have warped. Another is that the humidity is much higher. Another is that the arbors are probably off center. A real menace, but a drill bit drills neither round nor to size, and this causes wobble. Lastly, the plates themselves may have warped a bit.On the other hand the pinions were plus or minus 0.010" which seemed quite respectable. I went for the wheels, since they seemed to be the main culprits.
So I went wheel/pinion pair by pair and got them to spin freely again. This is a tedious task indeed. You have to sand until everything spins. On the third wheel I had to cut the teeth deeper, and I used the invaluable Dremel for the purpose. I did say it was tedious and I do not think it redundant to say again that it was
tedious.
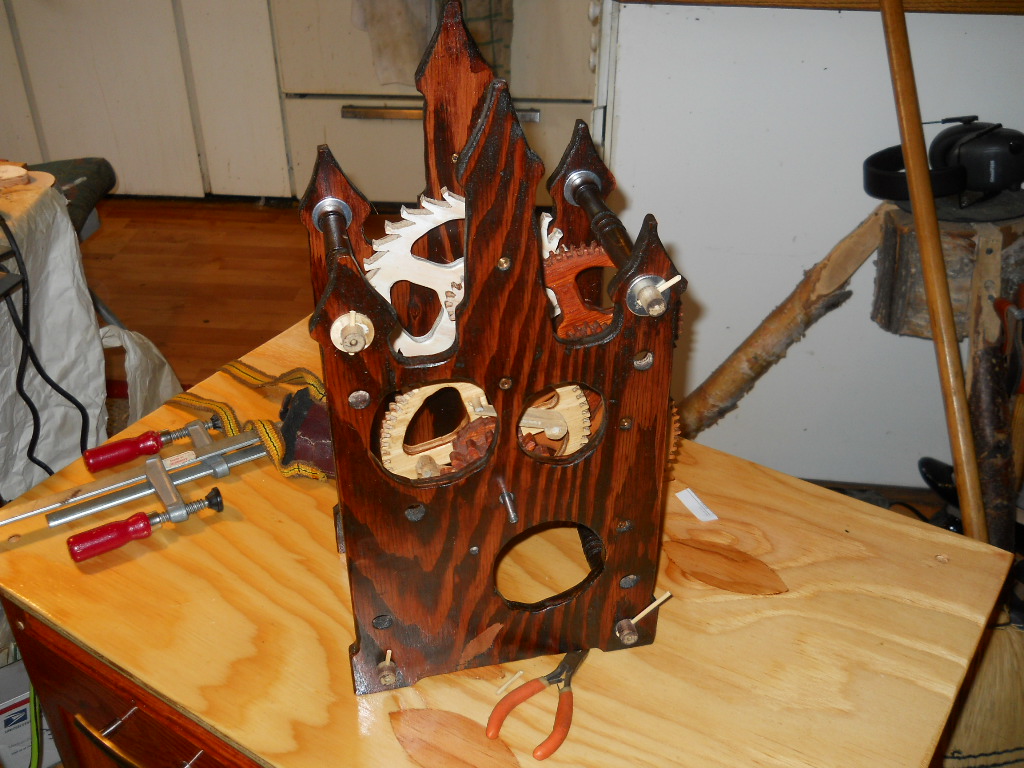
However, at the end...
...the clock is together again. Note that the finish is gone from all the teeth. It spins freely. Any binding would stop your clock. Mr Wilding's ideas on pivots are very good. But the adjustment is critical. What we have is little pointy things (pivots) running in brass bushings, and this is a Good Idea. But if the pivots are so much as 0.1mm too short they fall out of the bushings. If they are too long they bind. The pivots must have some slop, called
endshake in clockspeak. About one mm. If this is not provided, once again the clock binds. The clock has to rattle a bit. In brass this is no problem; but wood is a cantakerous material.
All the wooden clocks I have seen on the You Tube videos use steel arbors (shafts) and I think this is a much better idea than wooden shafts, even with the steel pivots. Steel does not warp as much as wood. But I followed the original plans and the book, and I learned something!
Meanwhile, I notice that nobody, myself included, can resist spinning the clock as they walk by. It is a Zen contraption.

No comments:
Post a Comment